
Open Kiosk
Platforms
Categories
Build Your Own Smart POS System for Retail Stores
Are you a small business owner, market vendor, or pop-up shop operator looking for an affordable, professional, and open-source point-of-sale system? Look no further, Open Kiosk is here! This DIY project walks you through building a complete retail kiosk powered by modern web technologies and real hardware components, all without recurring fees or vendor lock-in. With Open Kiosk, you can:
- Add and manage inventory
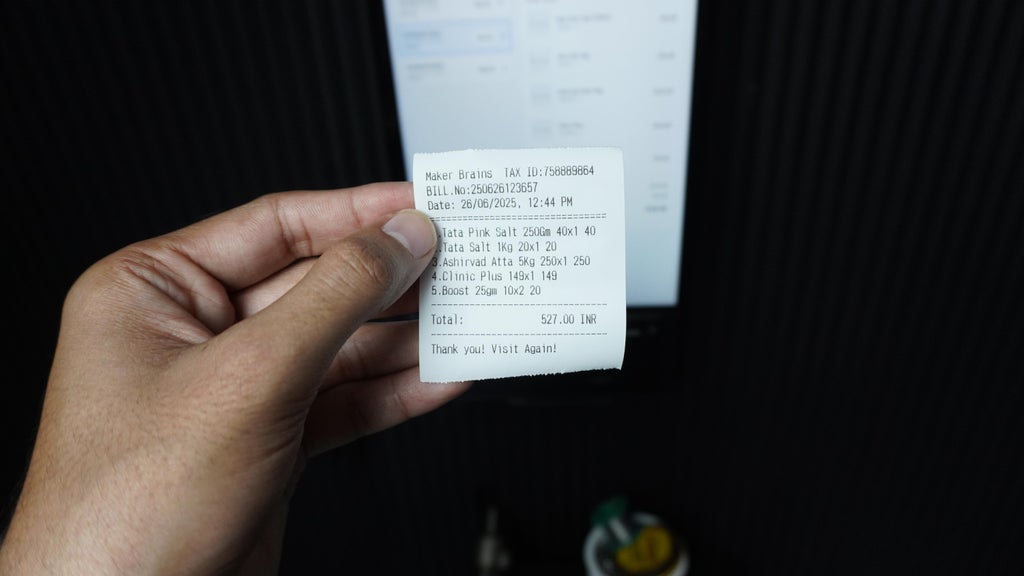
- Print thermal receipts
- Track sales and generate reports
- Use voice search
- Customize everything to suit your shop
Whether you are setting up a boutique, food stall, or mobile kiosk, this project helps you create a reliable and sleek POS system using components like a LattePanda MU, ESP32, and a thermal printer, all housed in a compact 3D-printed enclosure.
What You will Learn
- In this step-by-step guide, you will discover how to:
- Assemble kiosk hardware with ESP32 and LattePanda,
- Connect and configure a thermal printer via UART,
- Install and run the kiosk software with Firebase integration, generate sales reports and manage your business-like a pro.
Ready to revolutionize your store with a DIY smart kiosk?

Supplies
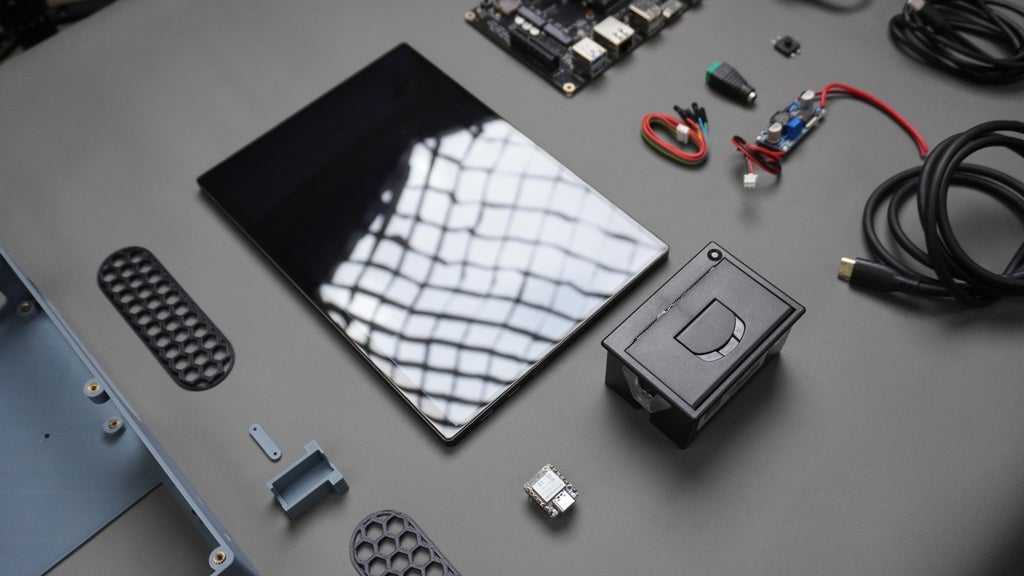
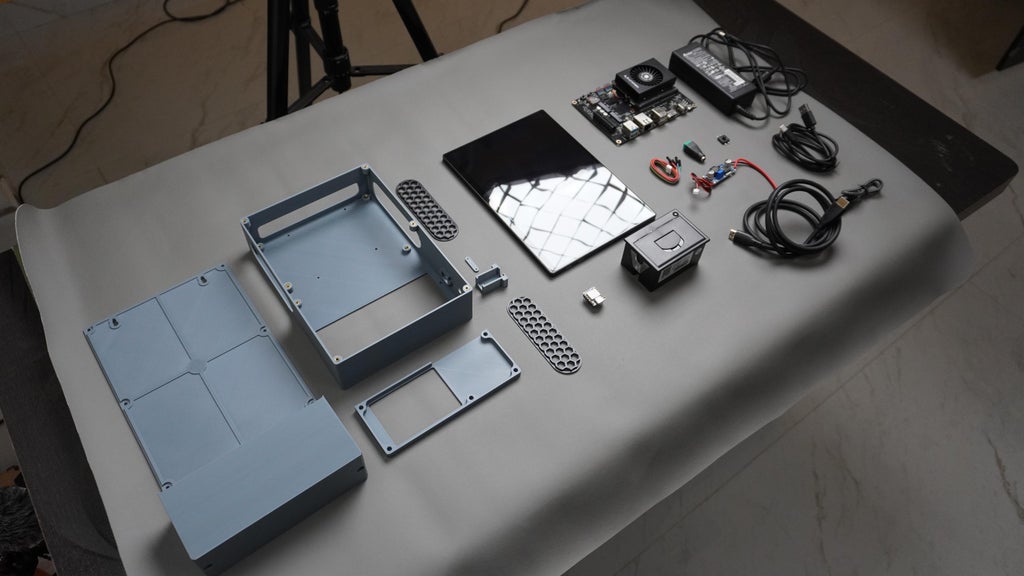 ** Hardware List**
Here is everything you will need to build your own Open Kiosk system:
** Hardware List**
Here is everything you will need to build your own Open Kiosk system:
- 1x Latte Panda MU KIT
- 1x Thermal Printer
- 1x 10.5" Touch Screen
- 1x Xiao ESP32 S3
- 1x Push Button
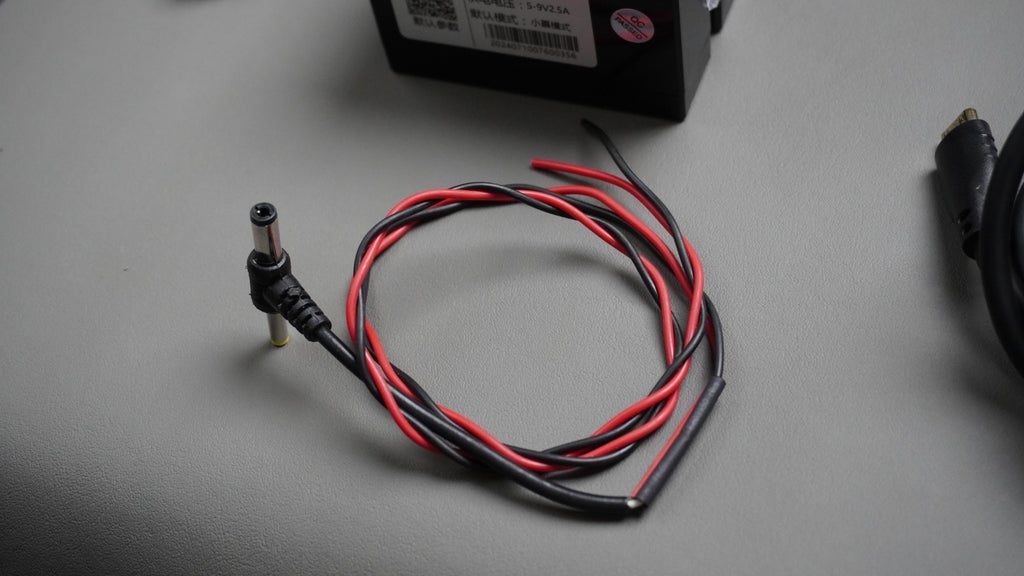
- 1x DC Female Connector
- 1x DC Male Connector
- 1x Wi-Fi USB Dongle
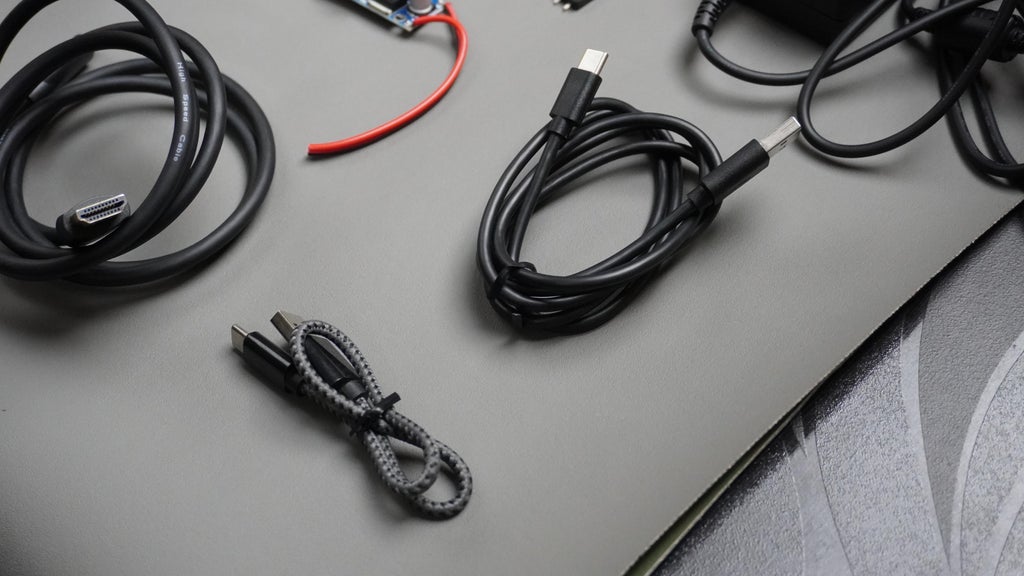
- 2x Type-c to Type-A Cable (1 included with screen)
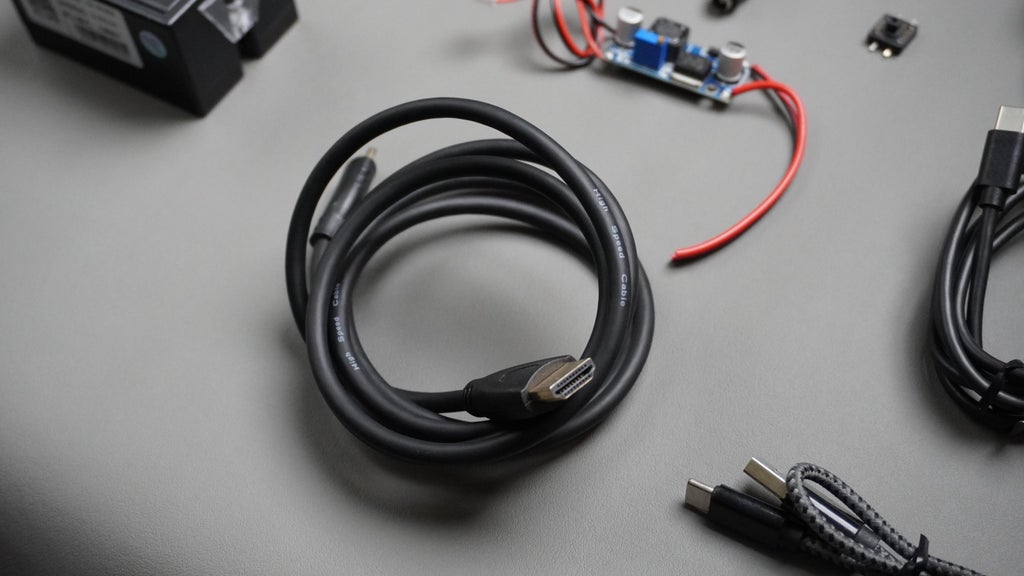
- 1x Micro HDMI to HDMI (included with screen)
Other Supplies:
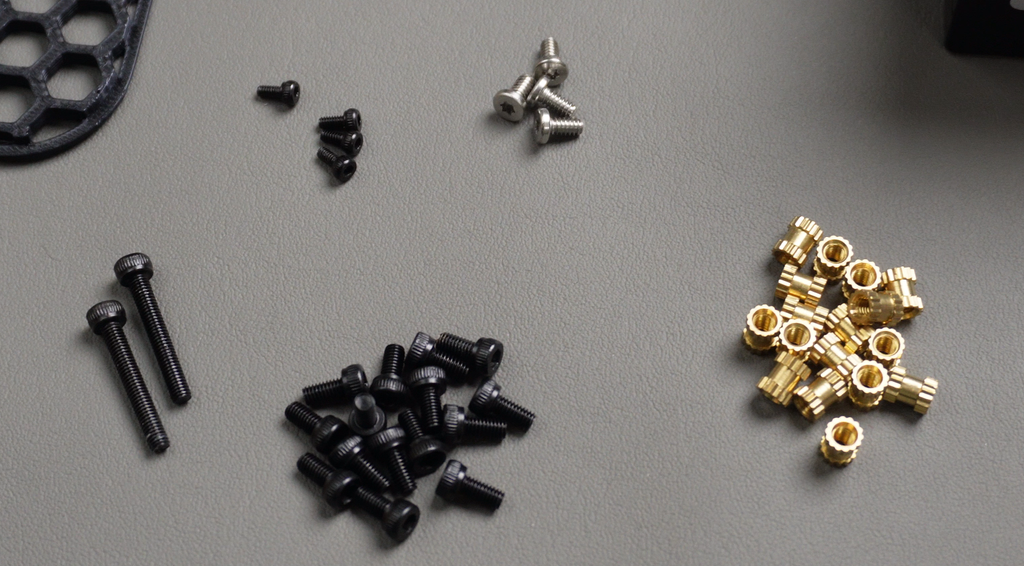
- 4x M2.5 6mm (Included with screen)
- 2x M3 16mm
- 15x M3 6mm
- 4x M2 6mm
- 11x M3x6mm Metal Heat Insert
- My 3D Printer
- My Screwdriver Kit
- My Soldering Station
- Heat Insert Solder Tip
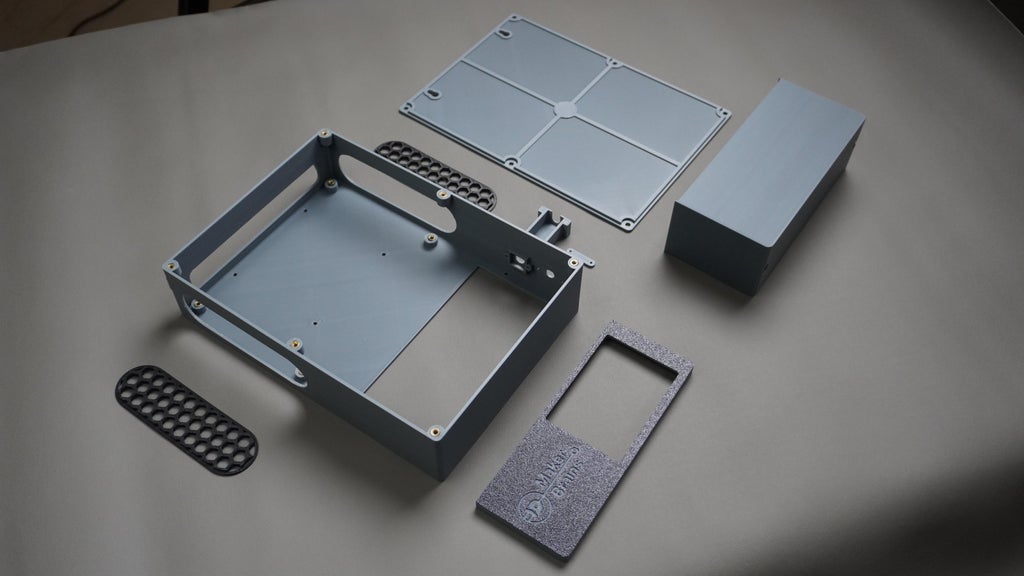
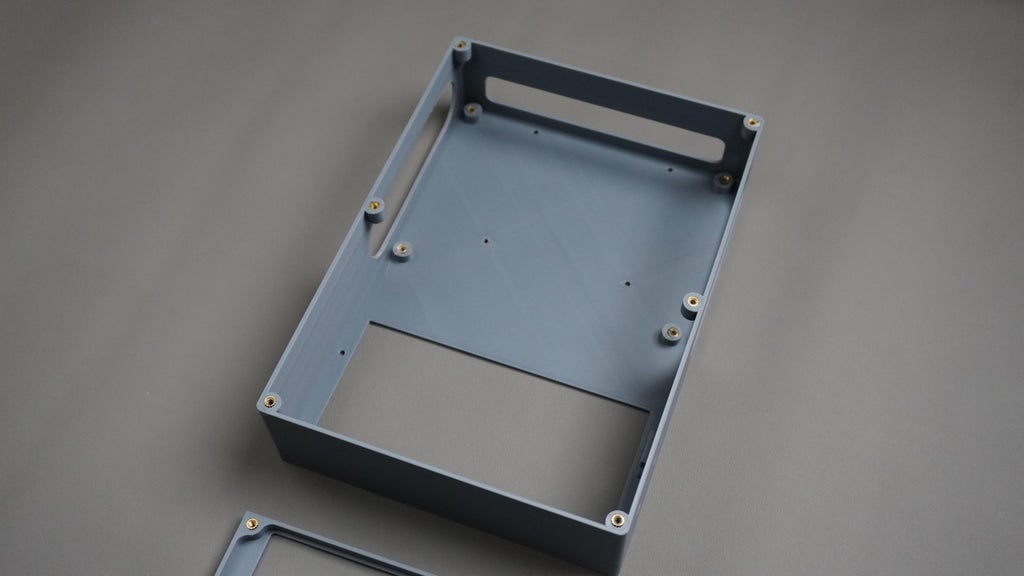
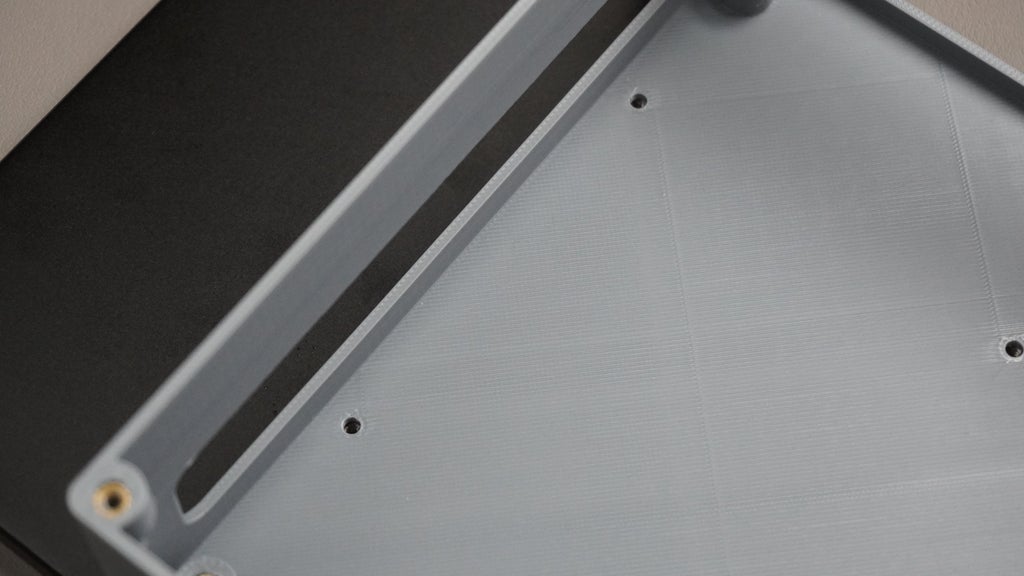
STEP 1: CAD and 3D Printing
 I designed the custom enclosure for Open Kiosk using Fusion 360 to ensure a compact, modular, and professional look.
CAD Modeling Process I started by importing official CAD models for components like the LattePanda MU.For parts without available models (e.g., thermal printer, connectors), I measured them manually and used datasheets to create accurate 3D models.Once all components were modeled, I began designing the enclosure to precisely house each part.
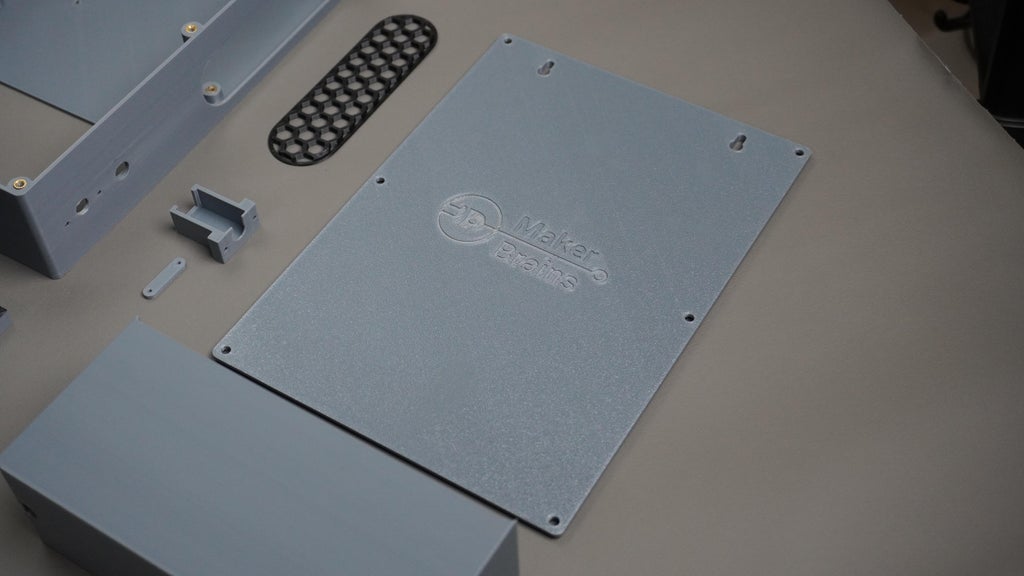
Enclosure Design Overview
- The enclosure includes several modular parts:
- Housing – Main frame to hold the display, LattePanda, ESP32, and wiring
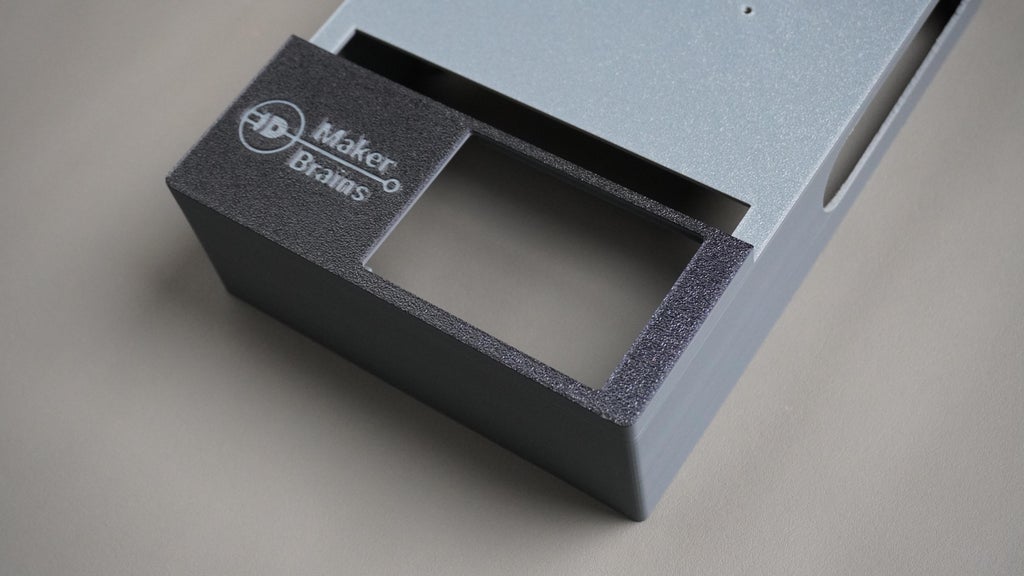
- Printer Cover – Mounts to the housing and secures the thermal printer
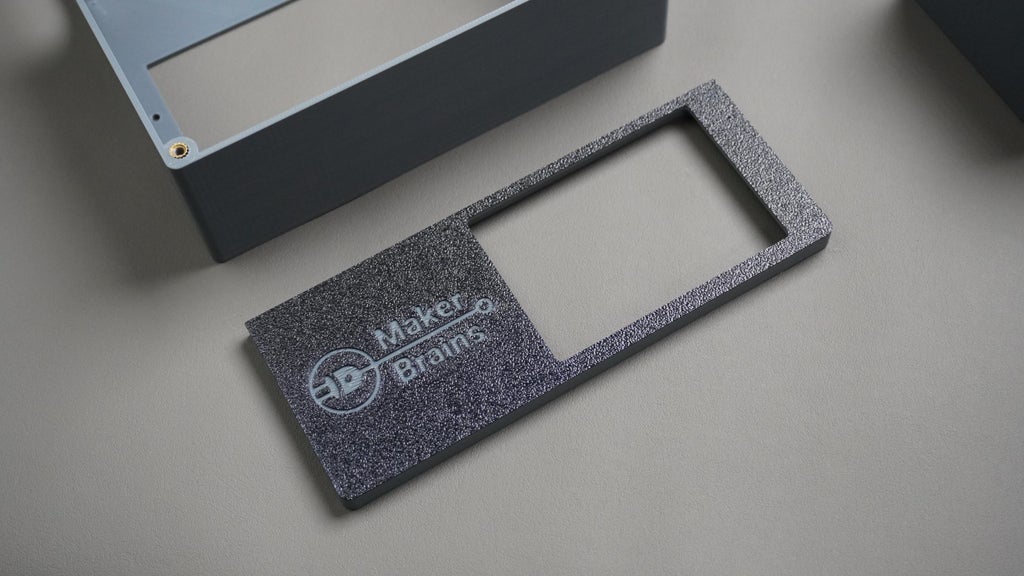
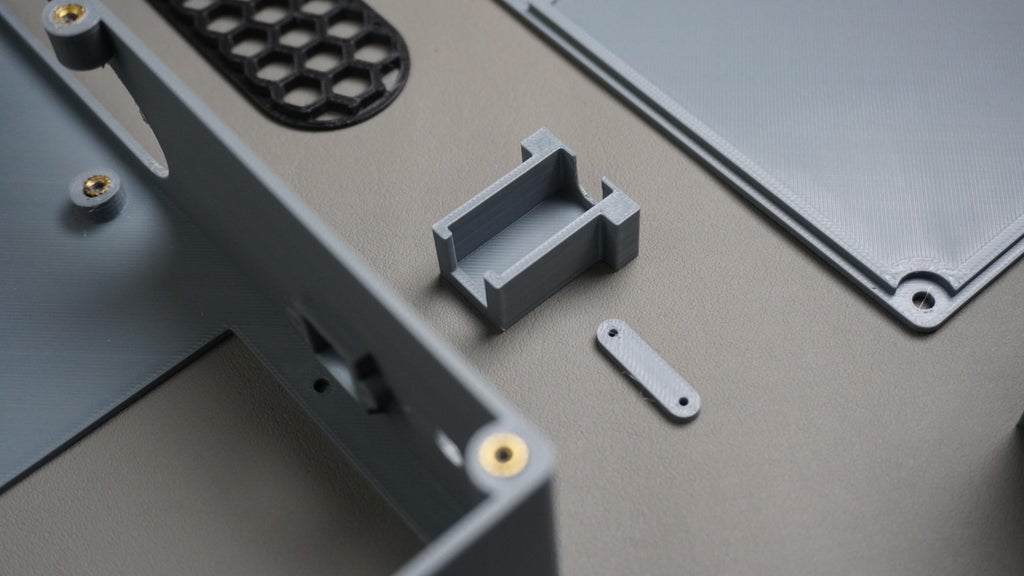
- DC Connector Holder – Allows the DC jack to be screwed firmly into the housing
- Button Clip – Holds the push button securely in place
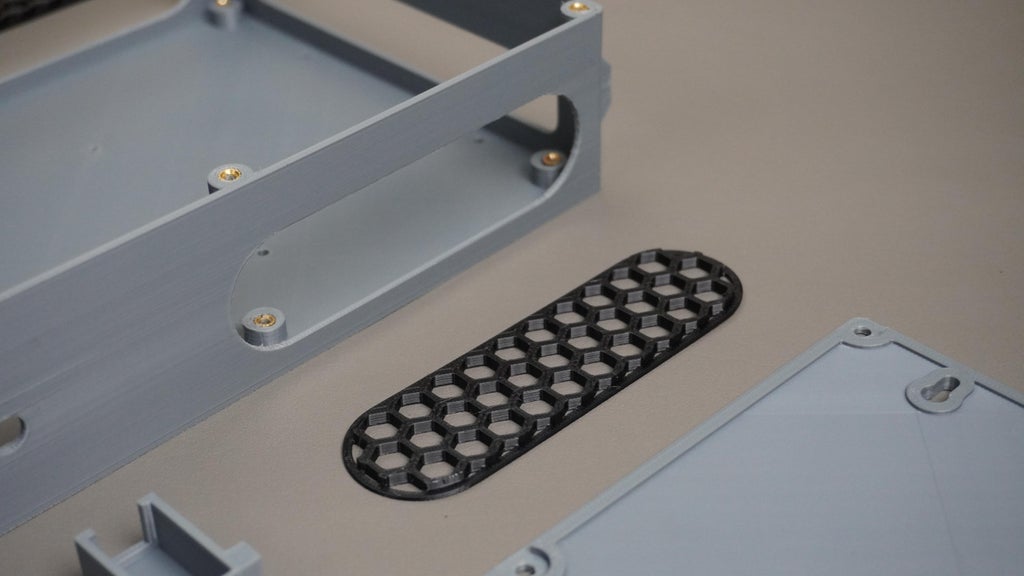
- Side Vents – Provides airflow for cooling
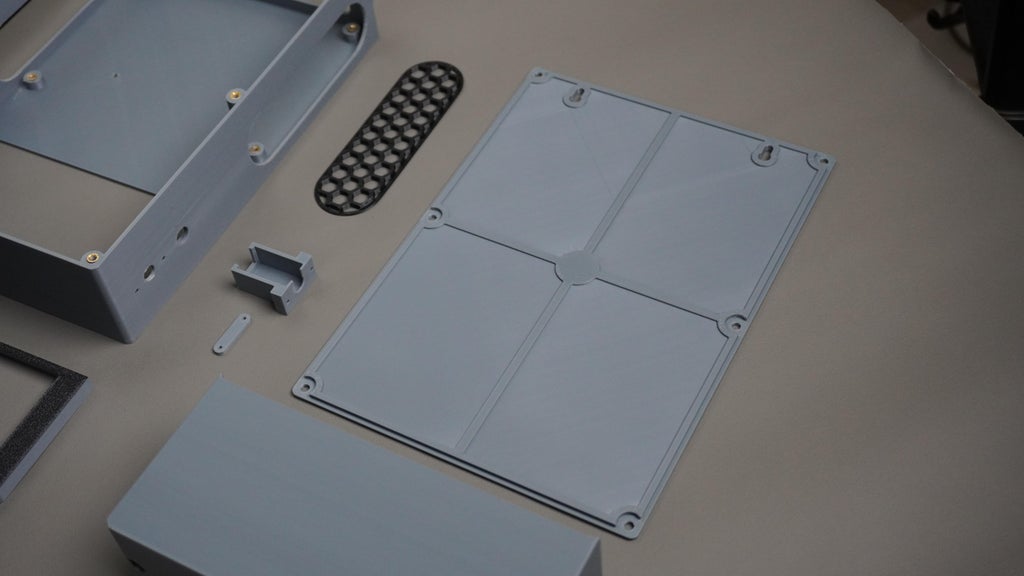
- Cover – Bottom cover to enclose the internal components
- Top Cover – Hides the exposed ports on top for a clean finish
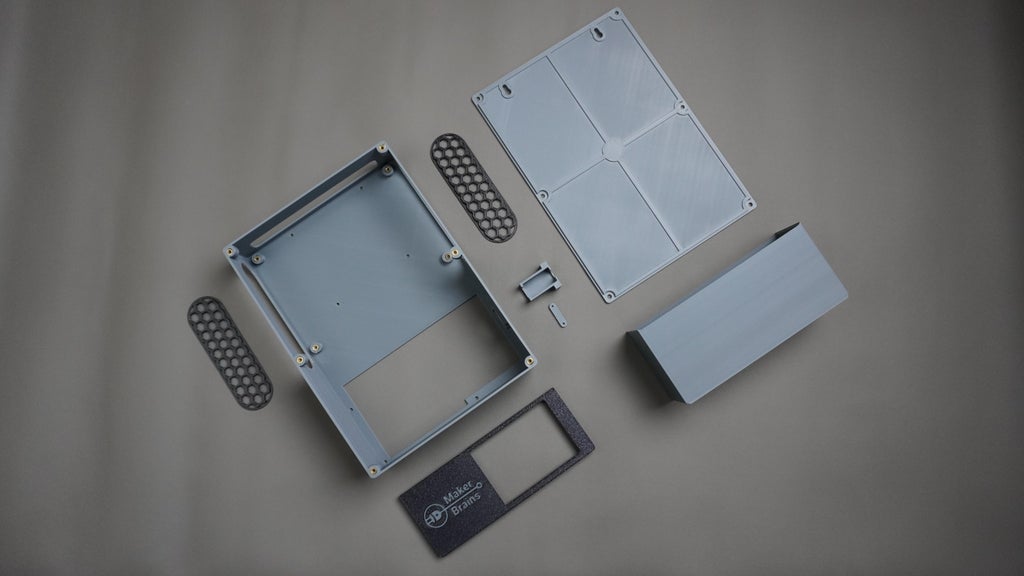
3D Printing Details All parts were printed on my Bambu Lab P1S using PLA+. The design supports metal heat inserts, so each part can be assembled using standard M2 and M3 screws.
Download Files You can either edit the original design in Fusion 360 using the provided CAD files or directly print using the.STL files below:
- 1x Housing.stl,
- 1x PrinterCover.stl,
- 2x SideVent.stl,
- 1x DCHolder.stl,
- 1x ButtonClip.stl,
- 1x Cover.stl,
- 1x TopCover.stl,

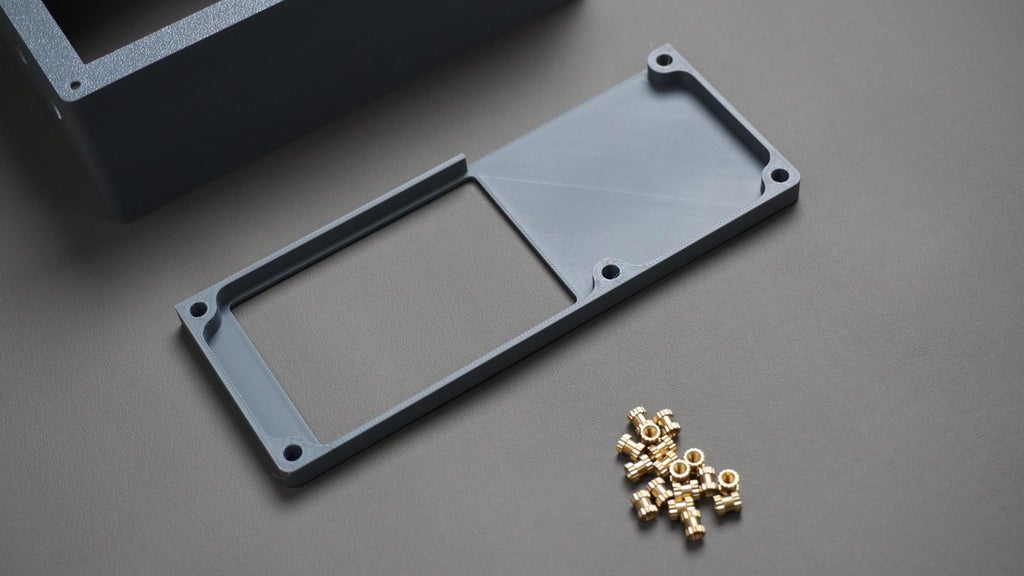
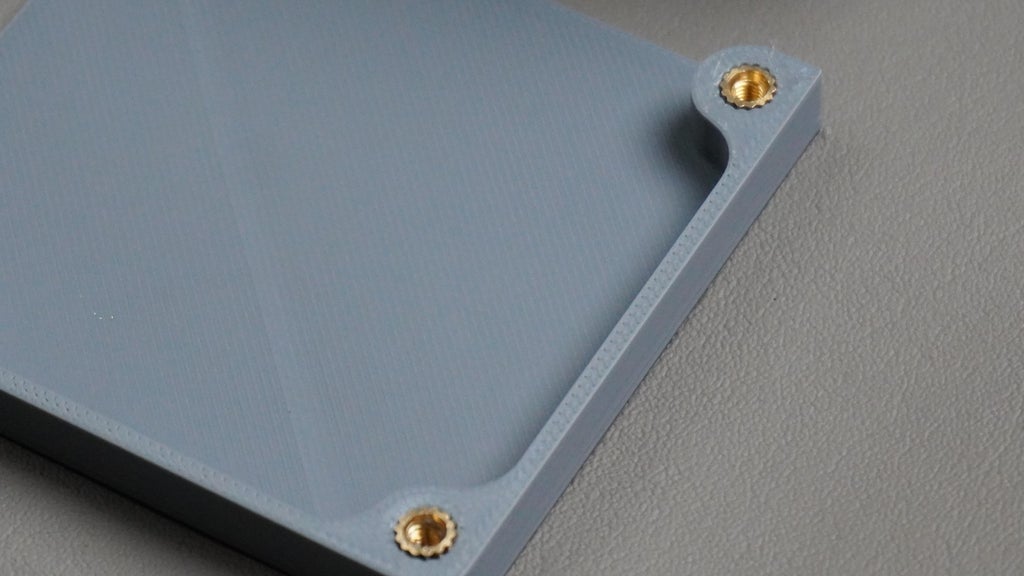
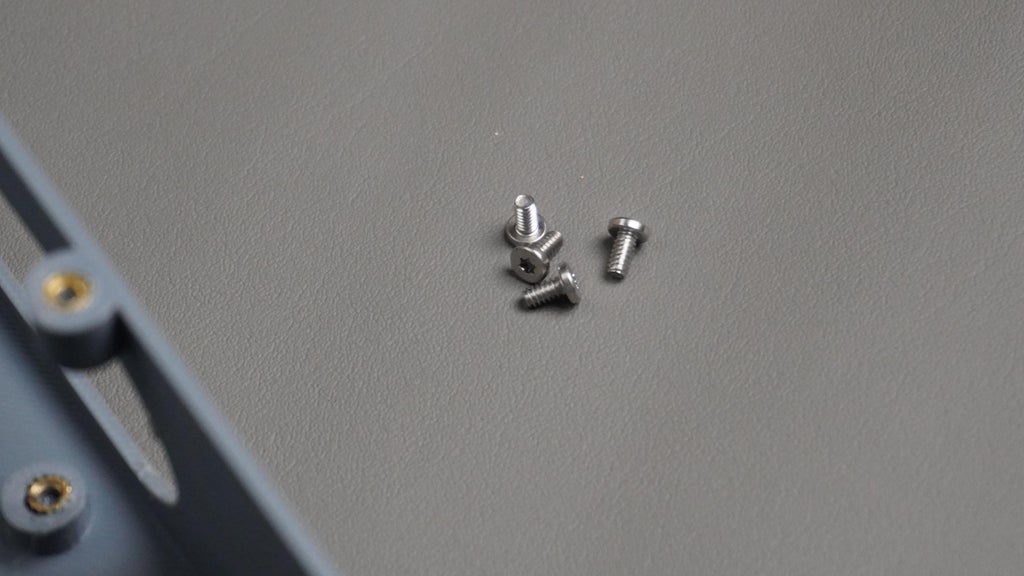
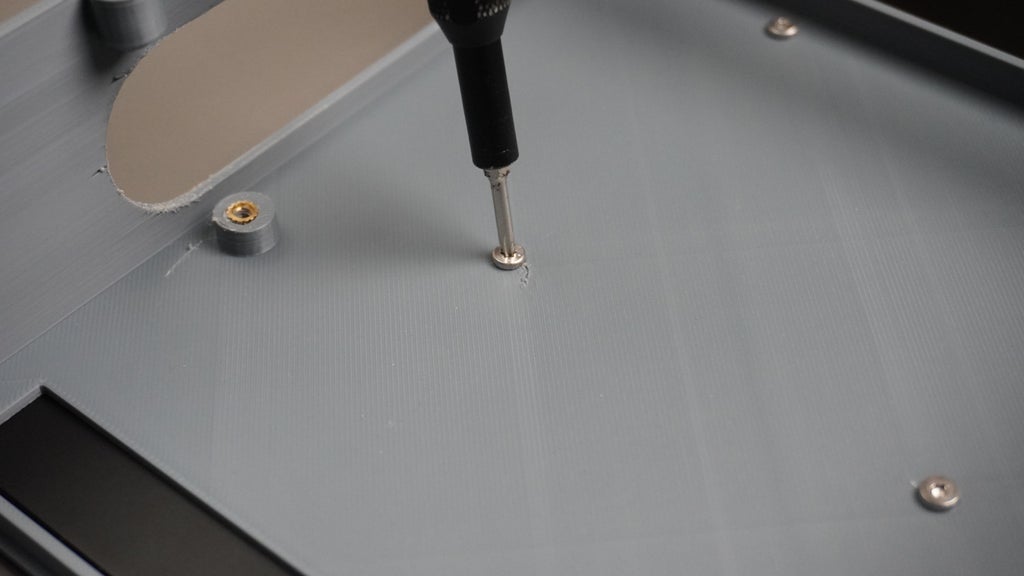
STEP 2: Embed Heat Inserts
 Before assembling the parts, we need to embed metal heat inserts into the 3D-printed parts. These allow us to screw everything together securely without damaging the plastic.
What You will Need:
- 11x M3 x 6mm heat-set inserts
- Soldering iron (preferably with a heat insert tip)
- Tweezers or pliers
- Housing and PrinterCover
Embedding Process
- Power up your soldering iron and set it to around 180–200°C (or according to your insert manufacturer’s recommendation).
- Place an insert on top of each designated hole in the Housing and Printer Cover parts.
- Using the tip of your iron, gently press down on the insert.
- Apply steady pressure until the insert slides flush into the plastic.
- If you're using a standard soldering tip (like I did), carefully hold the insert in place with tweezers while heating and pressing it in.
Let it cool for a few seconds before moving on to the next insert.
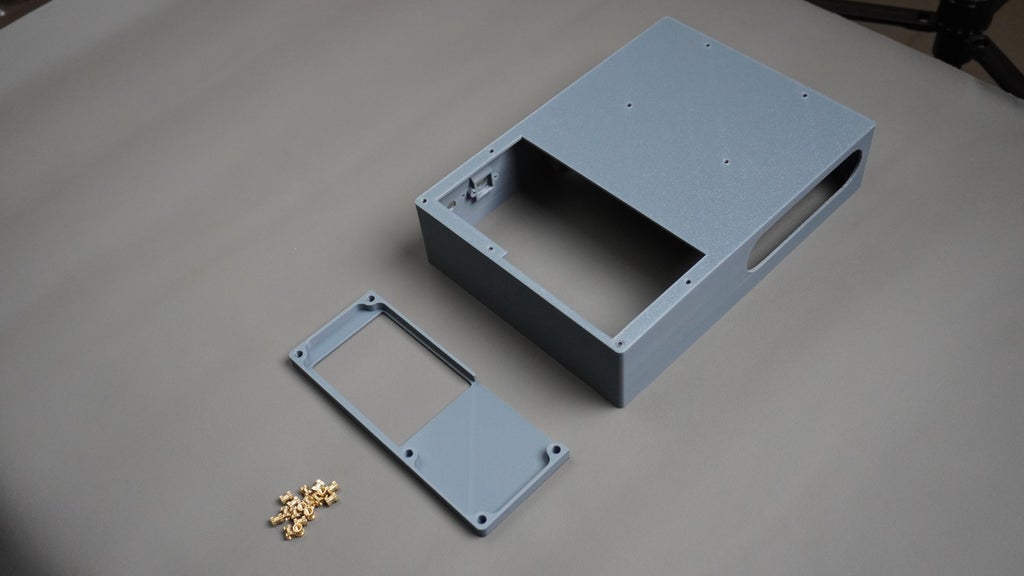
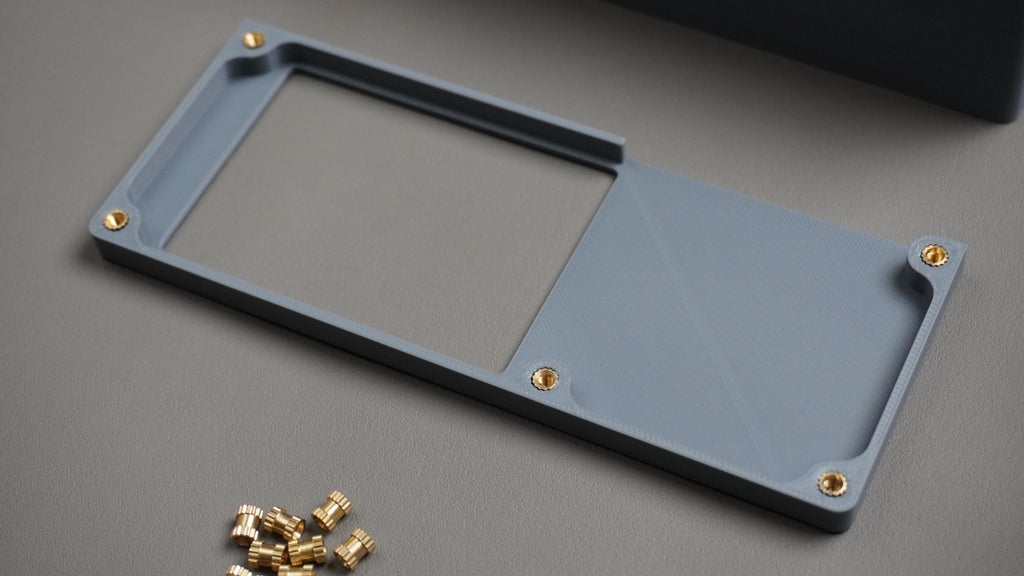
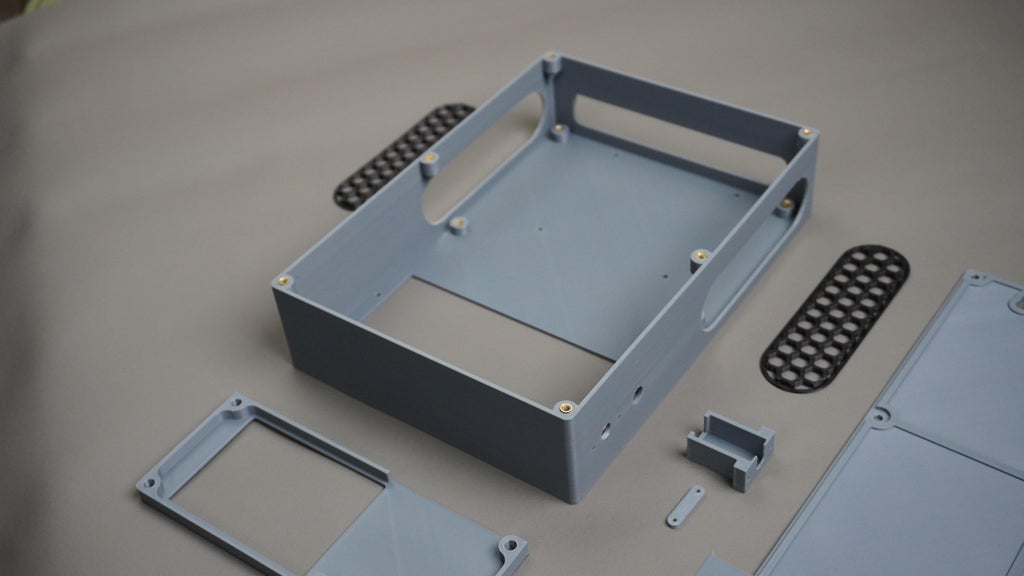
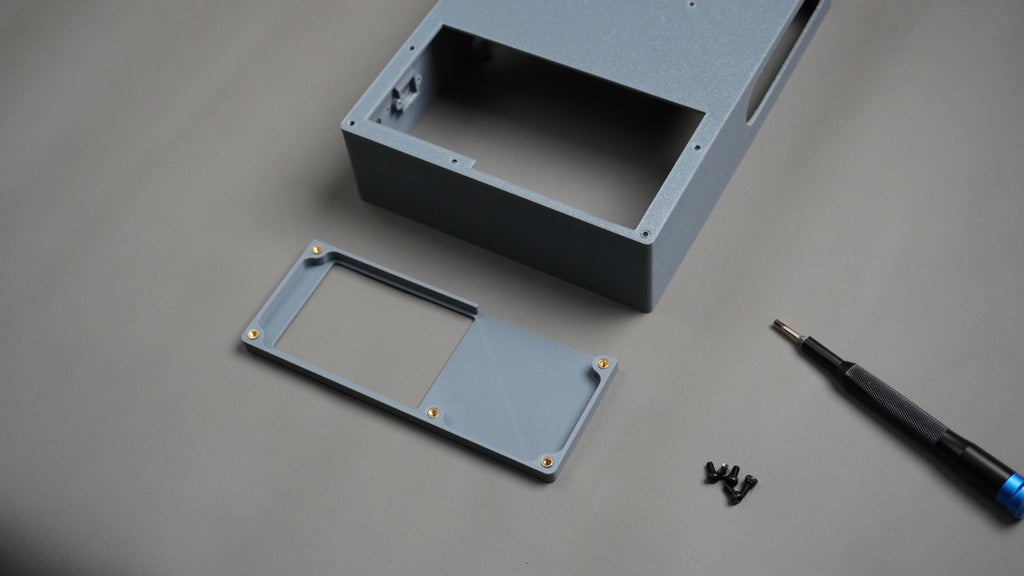
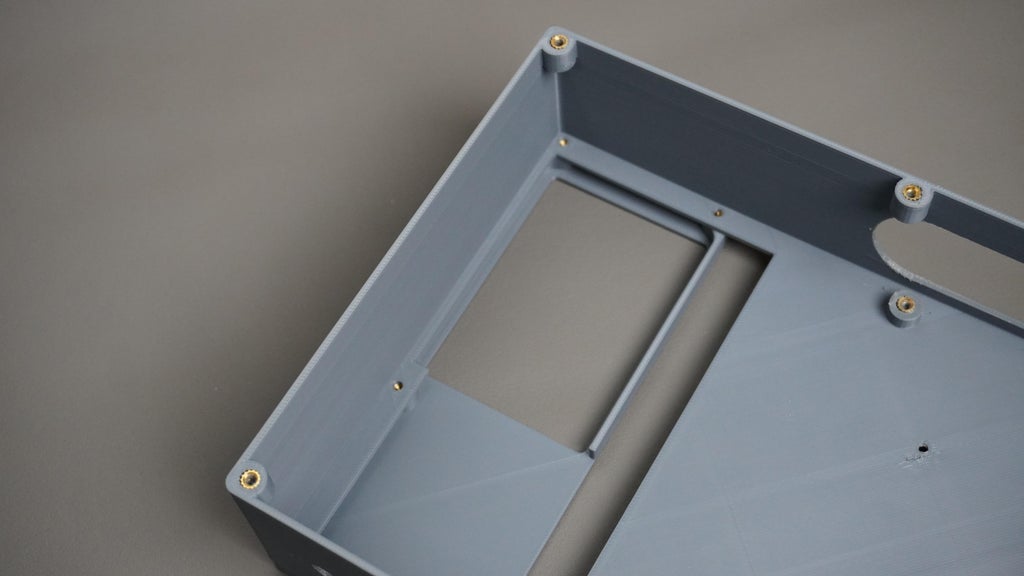
STEP 3: Assembling the Printer Cover
Now that the heat inserts are embedded, it's time to attach the Printer Cover to the main Housing.
What You will Need:
- Housing part
- PrinterCover part
- 5x M3 x 6mm screws
- Screwdriver or L-Key
Assembly Instructions:
- Align the PrinterCover with the Housing.
- The screw holes on both parts should line up cleanly.
- Insert the screws and tighten gently using a screwdriver until snug.
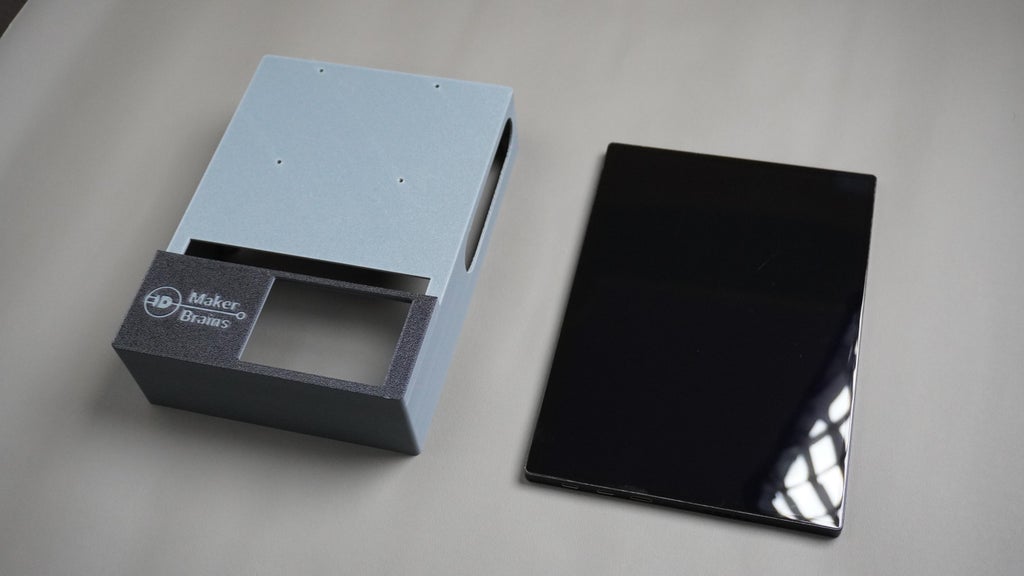
STEP 4: Assembling the Display
 Time to mount the touchscreen display onto the main housing.
What You will Need:
- Housing (main enclosure)
- 10.5" Touchscreen Display
- 4x M2.5 screws (included with the display)
- Screwdriver
Assembly Instructions:
- Align the display with the pre-designed mounting holes on the Housing.
- Insert the M2.5 screws and tighten all four screws evenly, one at a time.
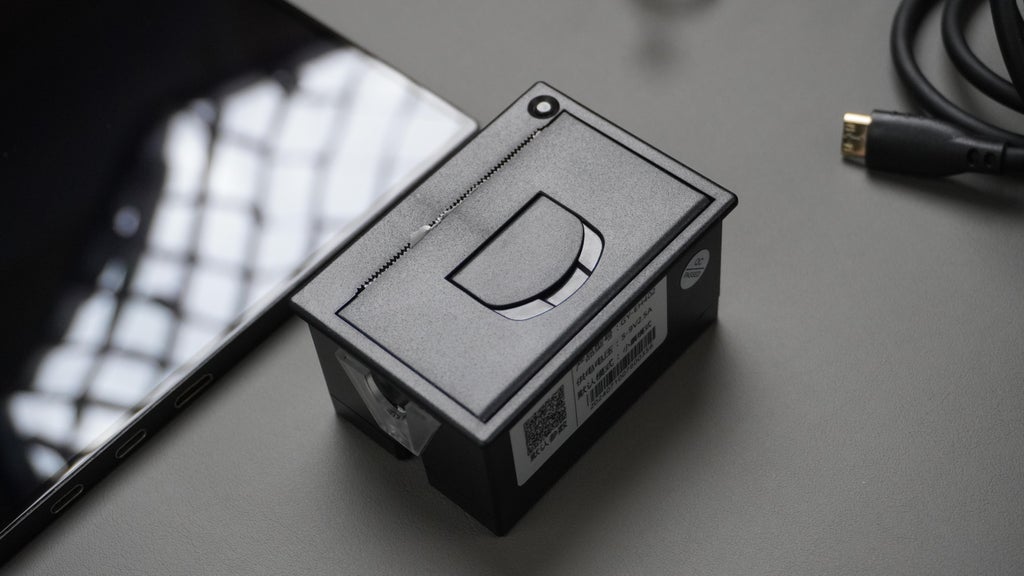
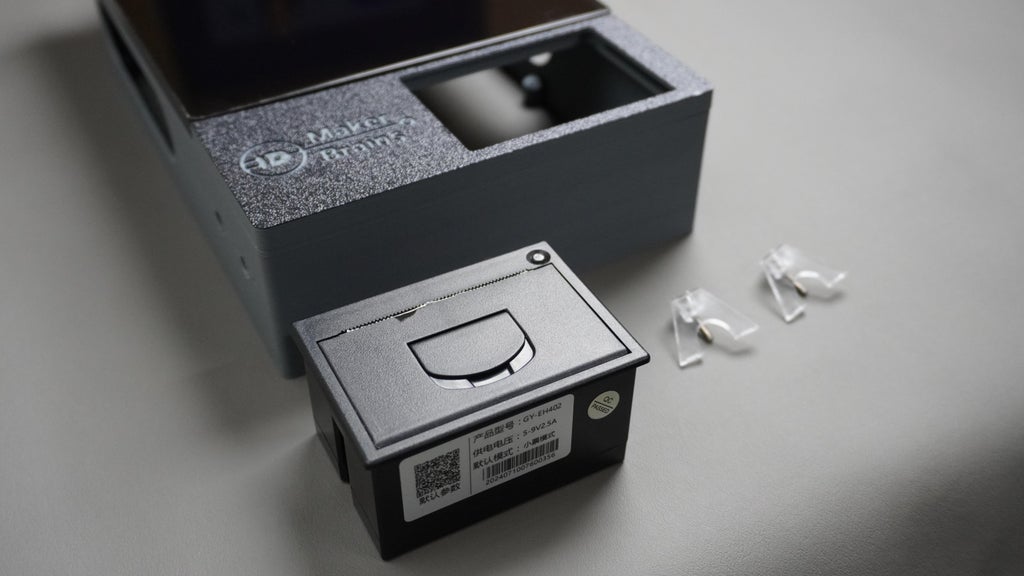
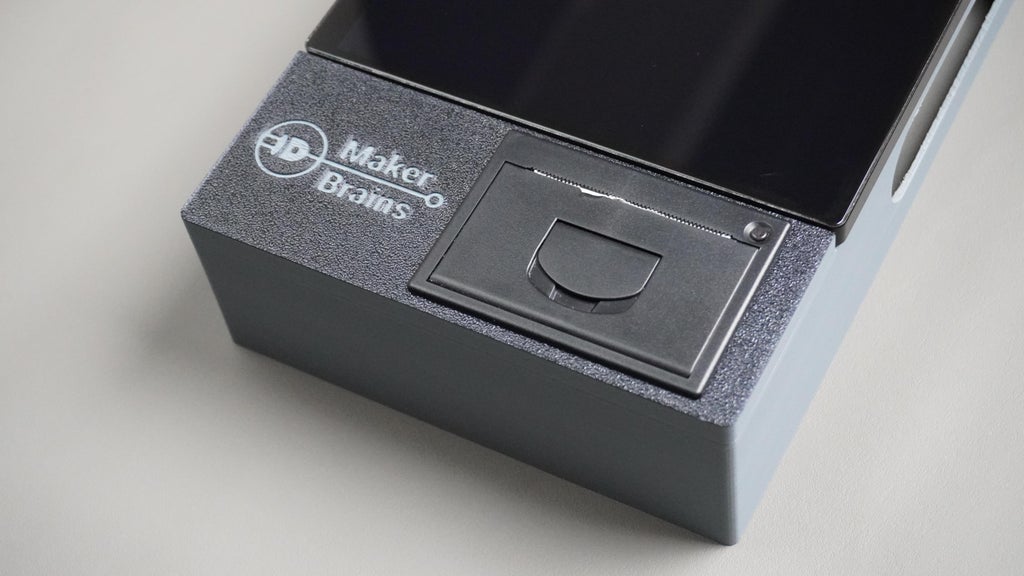
STEP 5: Assembling the Thermal Printer
 Now we will install the thermal printer into the enclosure.
What You will Need:
- Thermal Printer (58mm or 80mm)
- Screwdriver
- Assembled Housing + PrinterCover unit
Assembly Instructions:
- Use a screwdriver to carefully unscrew and detach both side mounting brackets from the printer body.
- Insert the printer into the PrinterCover opening.
- Screw the clips back, to secure the printer firmly to the housing.


STEP 6: Assembling the Side Vents


- Take the two side vents and locate their matching slots on either side of the main housing.
- Snap each vent into place by gently pressing it into its slot.
- If the vents feel loose or wobbly, apply a small amount of quick glue to the contact edges and press them in firmly until dry.
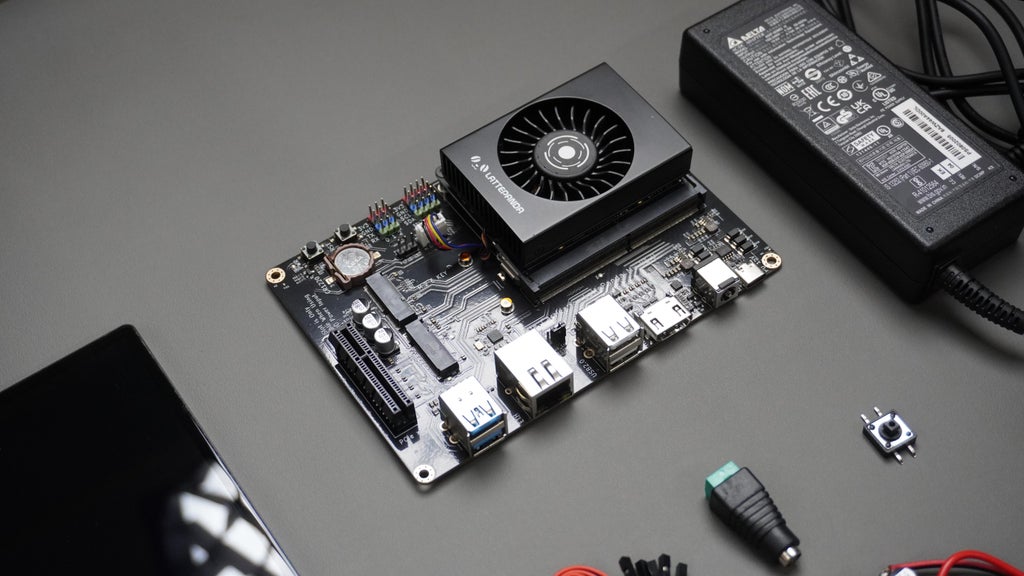
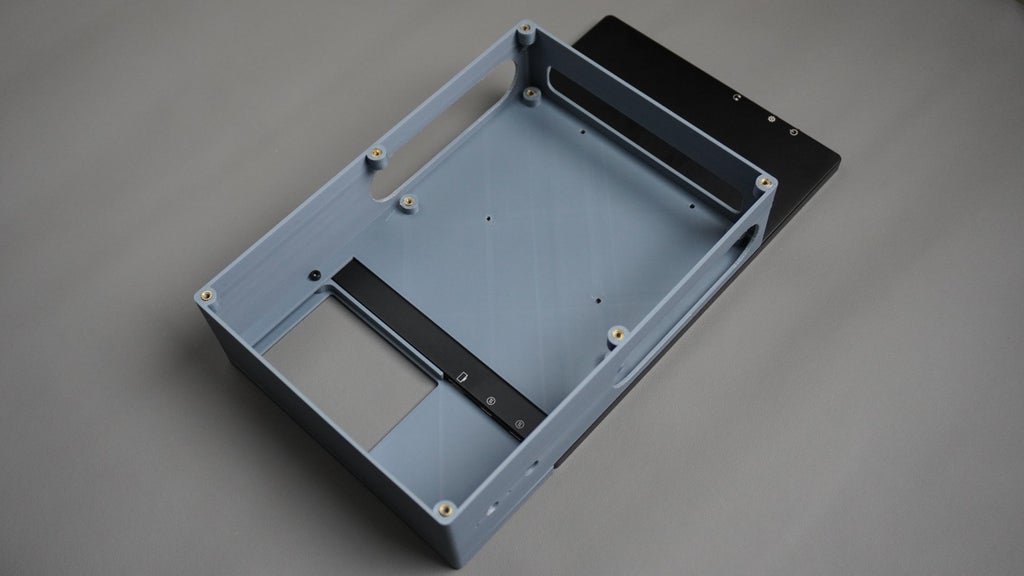
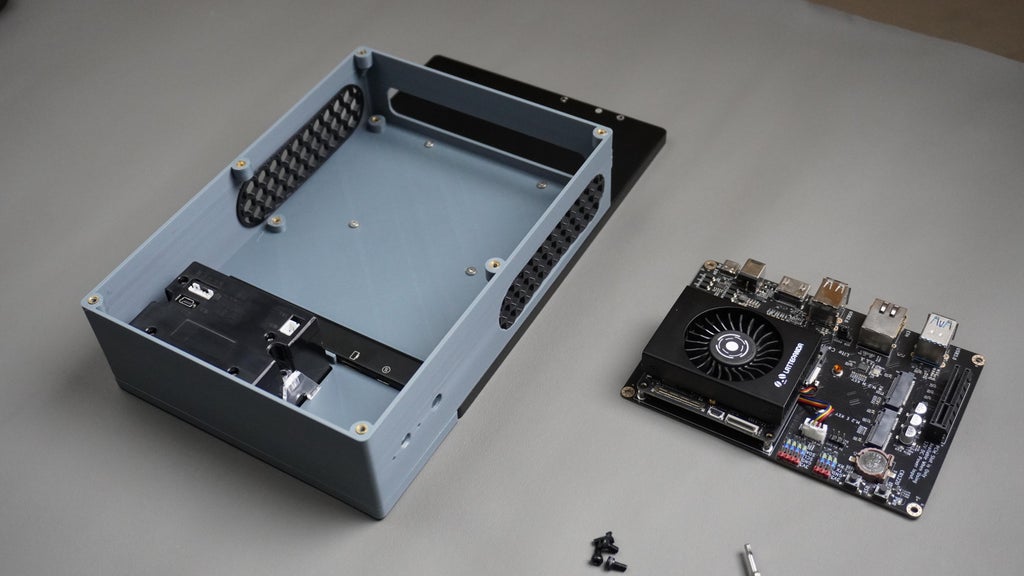
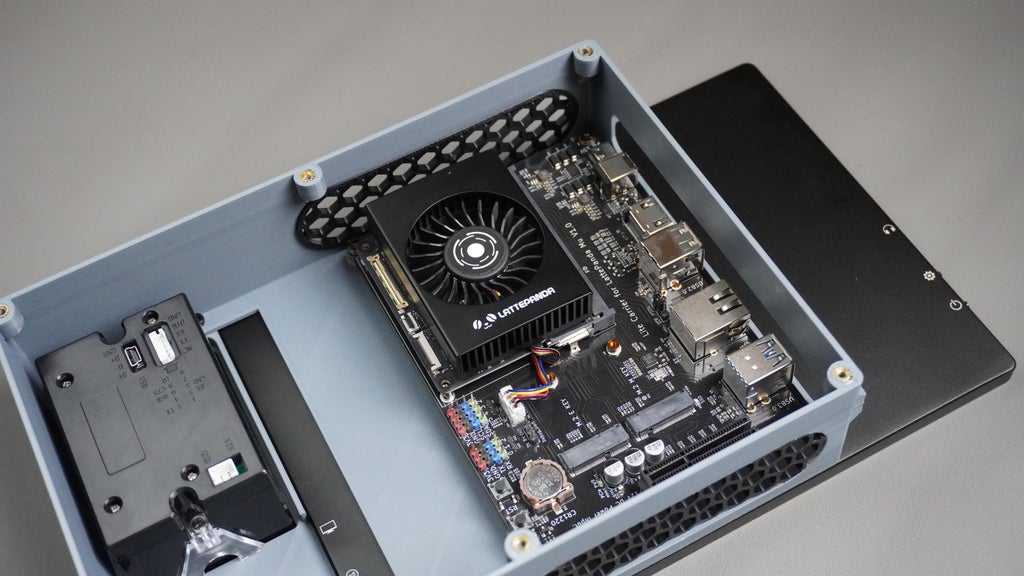
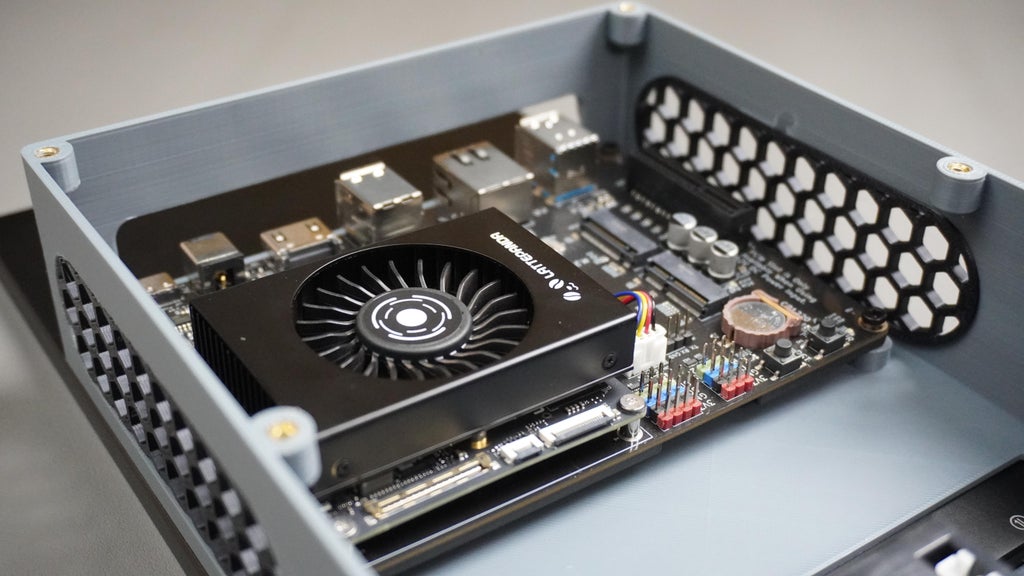
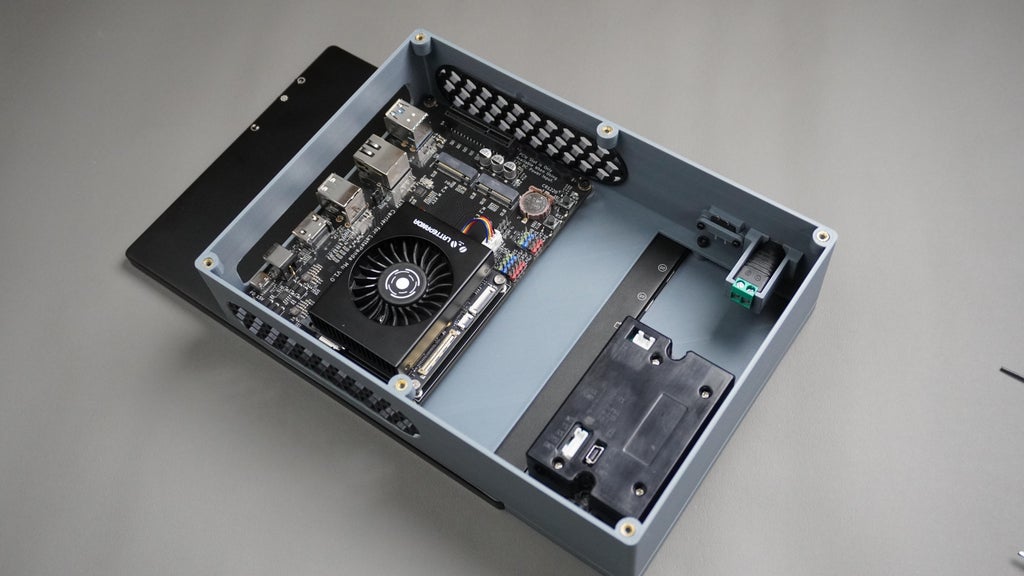
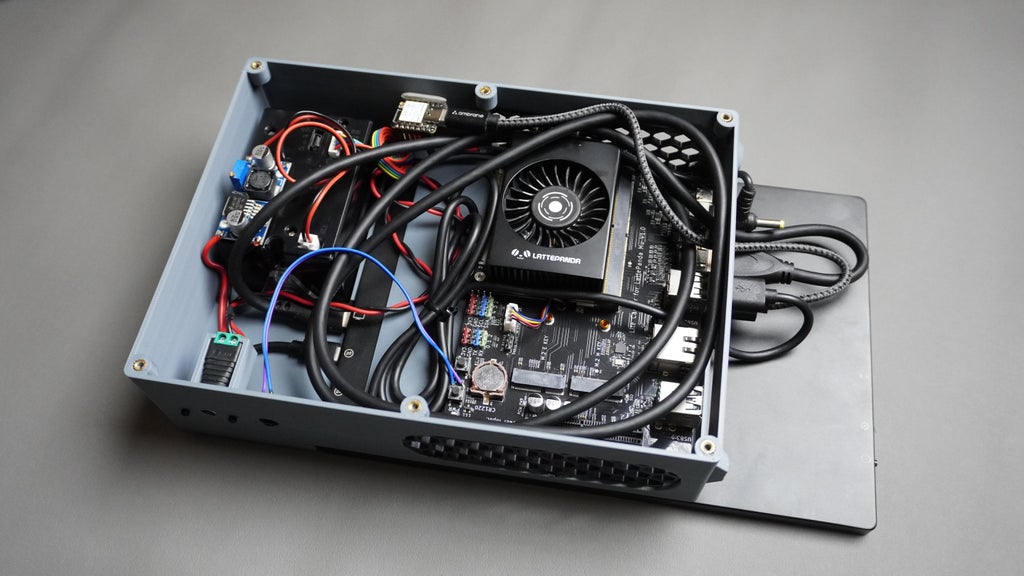
STEP 7: Assembling the LattePanda MU
 Now it's time to install the brain of your kiosk, the LattePanda MU board. This powerful mini-PC handles the entire software stack of Open Kiosk.
What You will Need:
- LattePanda MU (assembled board)
- 4x M3 x 6mm screws
- Assembled Housing
- Screwdriver
Assembly Instructions:
- Position the LattePanda MU inside the housing.
- Align the board so its mounting holes line up with the M3 heat inserts embedded in the housing.
- Insert 4x M3 x 6mm screws into the mounting holes.
- Tighten the screws evenly until the board is firmly mounted to the enclosure.
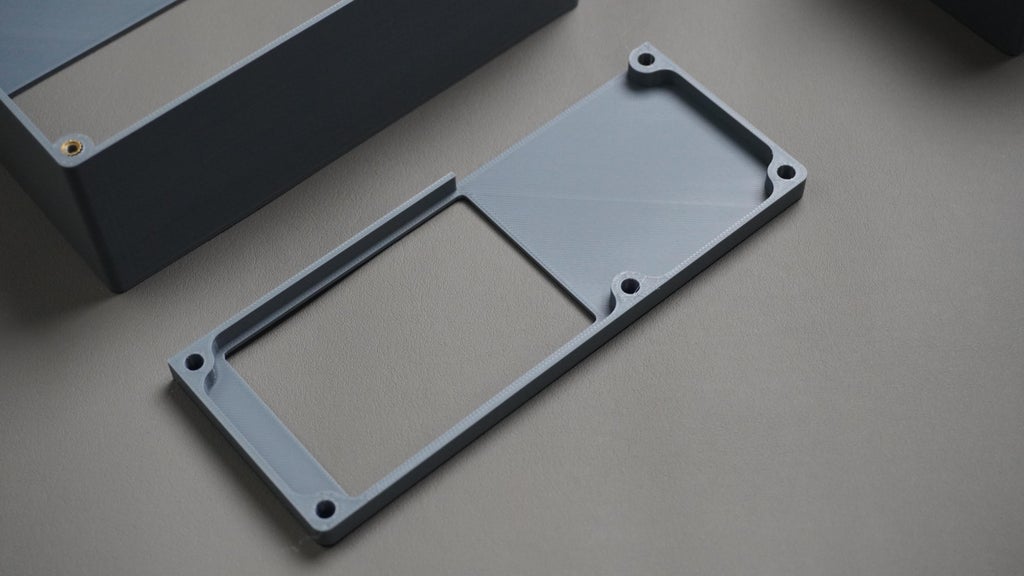
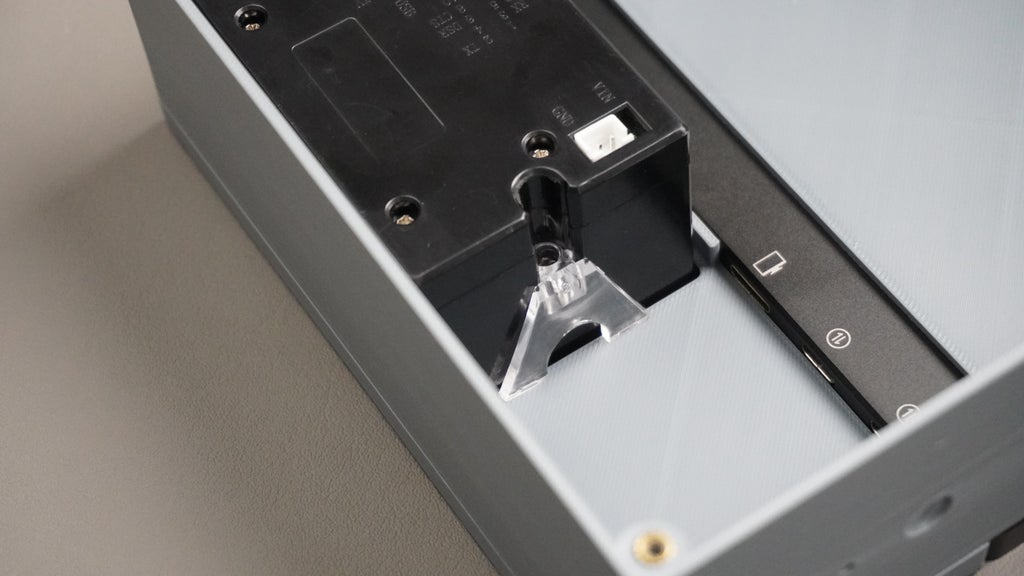
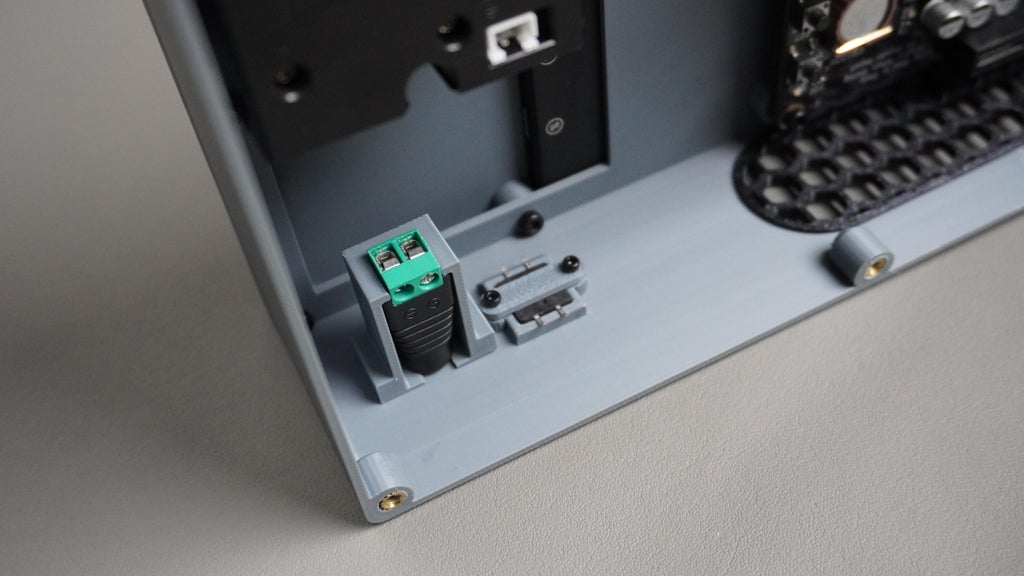
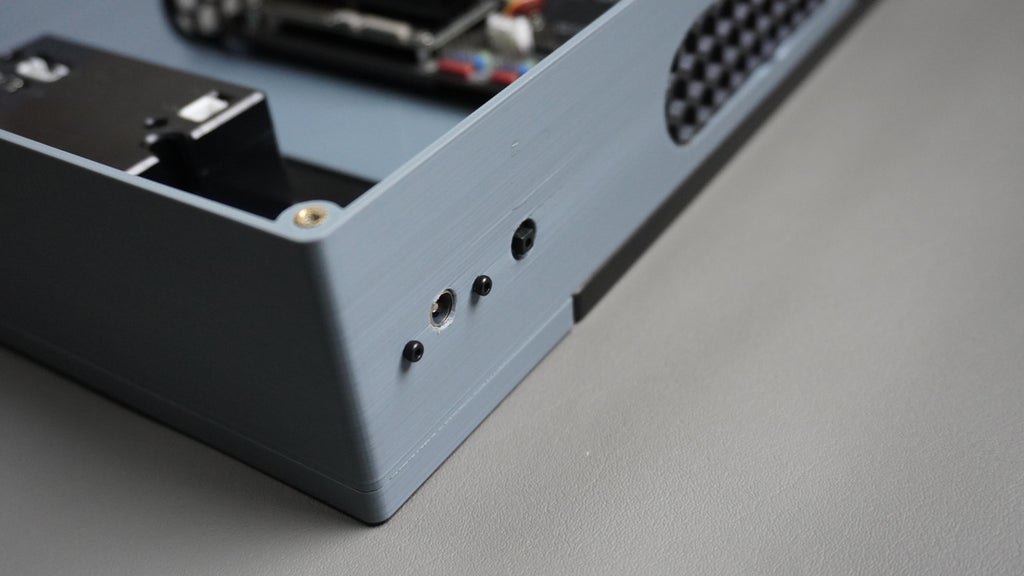
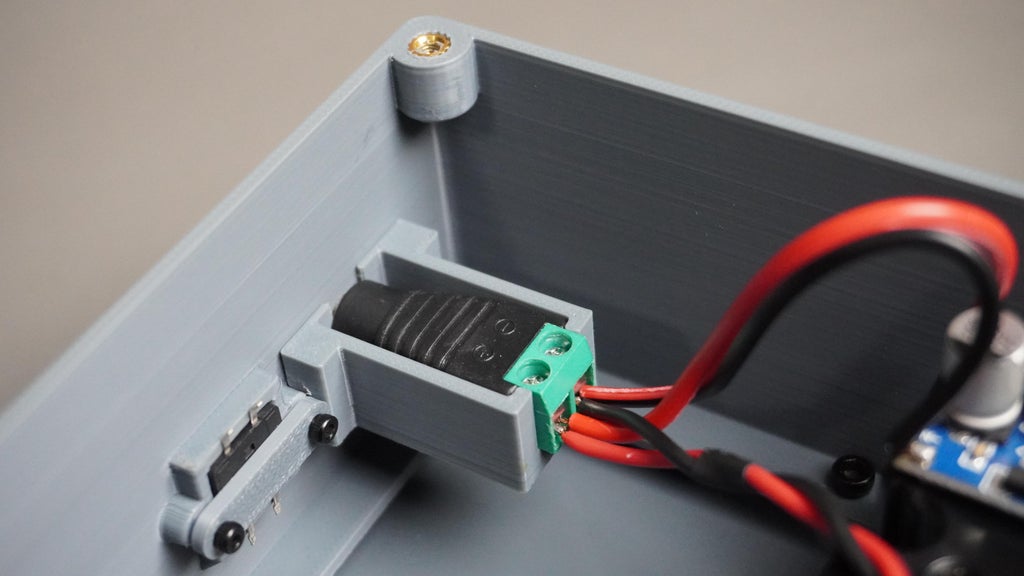
STEP 8: Assembling the DC Connector & Power Button
Now let's install the power input (DC connector) and the push-button power switch.
What You will Need:
- DC Female Connector
- 3D-printed DC Holder (DCHolder.stl)
- Push Button
- 3D-printed Button Clip (ButtonClip.stl)
- 4x M2 x 6mm screws
- Screwdriver
Assembly Instructions: Part A: DC Connector
- Insert the DC connector into the 3D-printed DC holder, it should snap in snugly.
- Align the DC holder with the dedicated mounting slot on the housing.
- Secure it with 2x M2 x 6mm screws.
Part B: Push Button
- Insert the push button into the slot on the housing.
- Place the 3D-printed button clip over the button from inside the housing to hold it in place.
- Secure the clip using 2x M2 x 6mm screws into the matching holes.


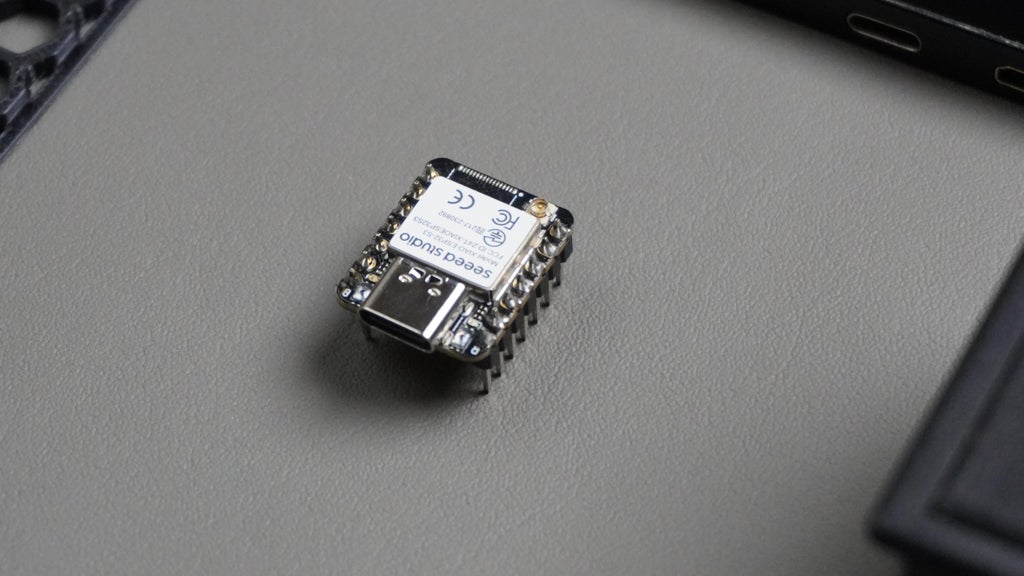
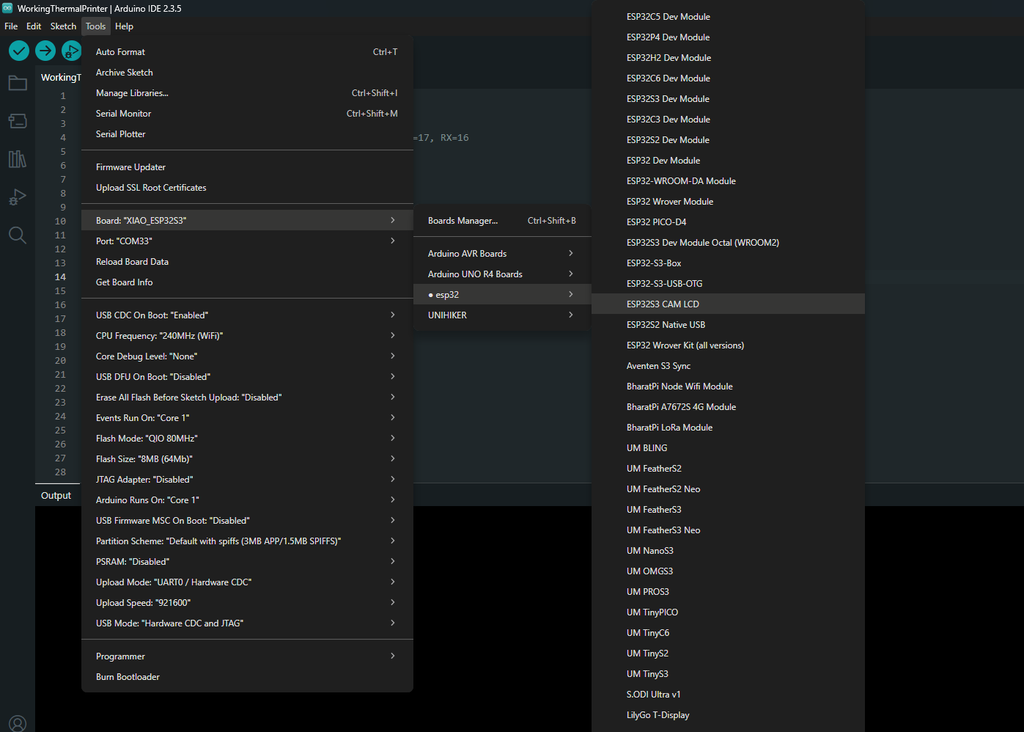
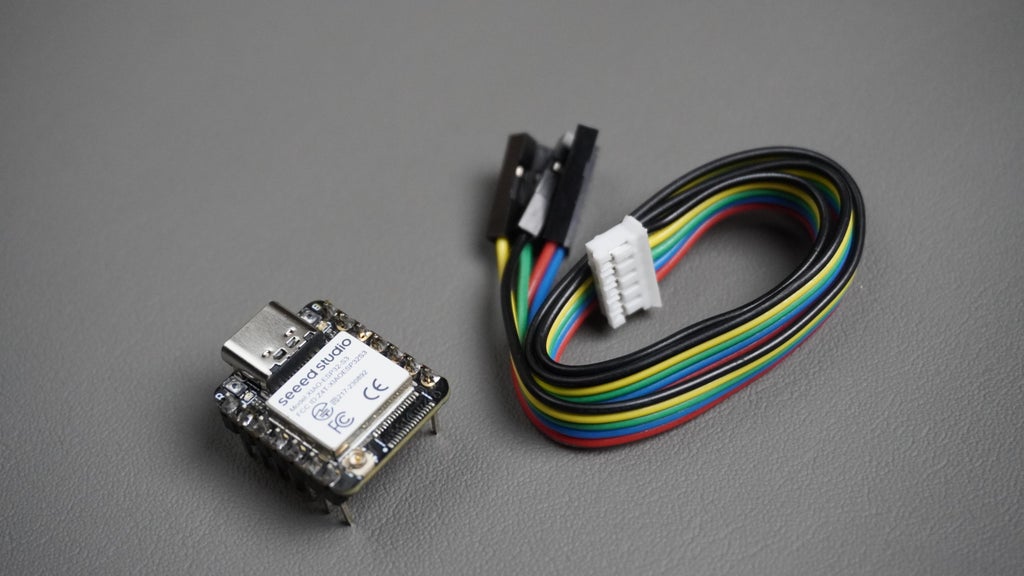
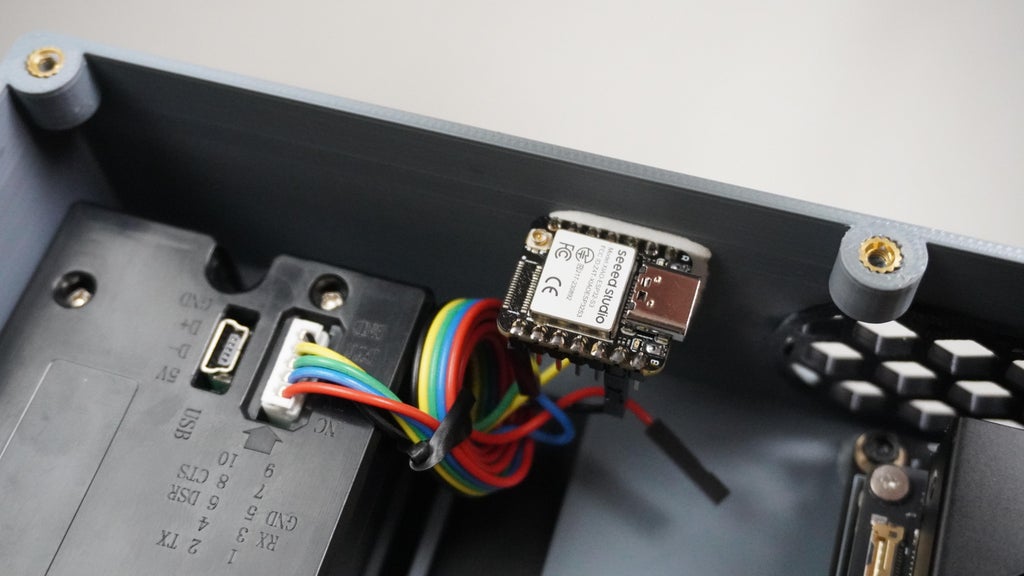
STEP 9: Programming the Xiao ESP32
The Xiao ESP32 S3 acts as the bridge between the kiosk software and the thermal printer. Let’s upload the firmware to handle UART printing.
What You will Need: Seeed Xiao ESP32 S3 USB-C Cable Arduino IDE (installed on your PC)ThermalPrinter.ino sketch Internet connection (for installing board and libraries)
Programming Instructions:
- Open Arduino IDE on your computer.
- Install the ESP32 Board Manager:
- Go to File → PreferencesIn the “Additional Board Manager URLs”, add: https://raw.githubusercontent.com/espressif/arduino-esp32/gh-pages/package_esp32_index.json
- Go to Tools → Board → Boards ManagerSearch for ESP32 and install the latest version.
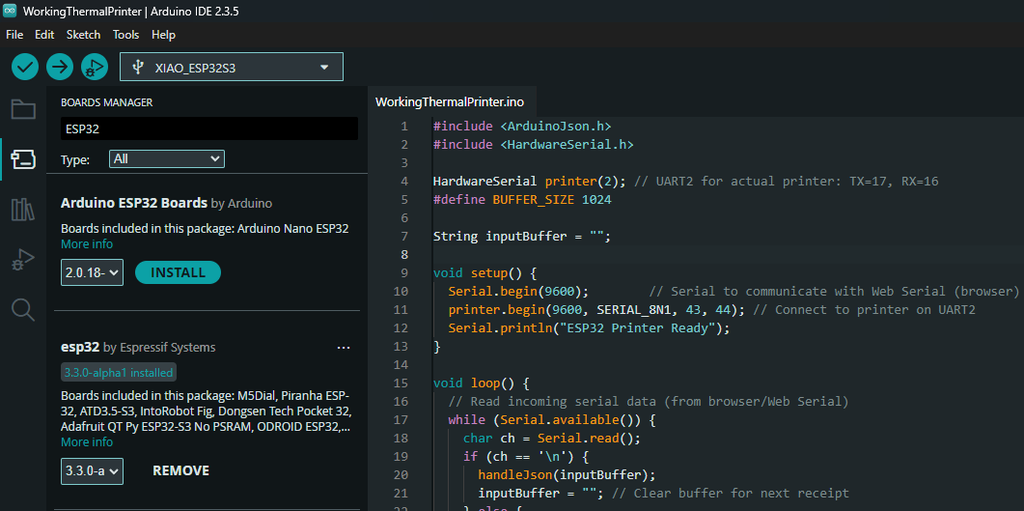
Install Required Library:
- Go to Tools → Manage Libraries
- Search for and install: ArduinoJson library
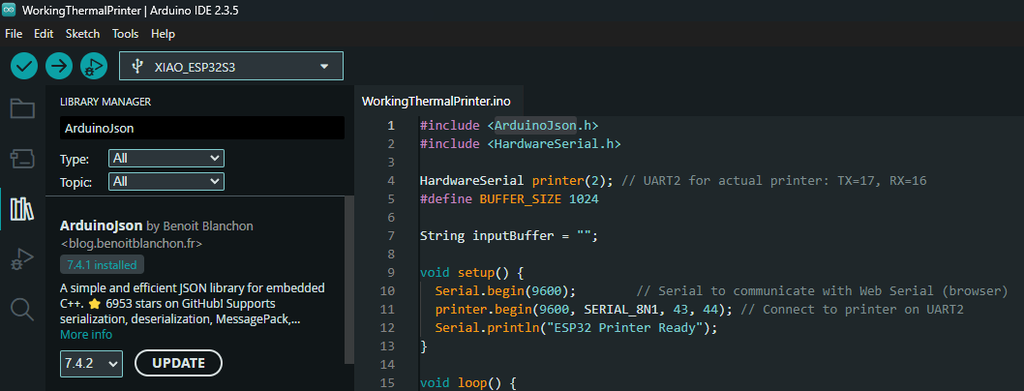
Load the Code:
- Open ThermalPrinter.ino from the project files: Open Kiosk GitHub Repo
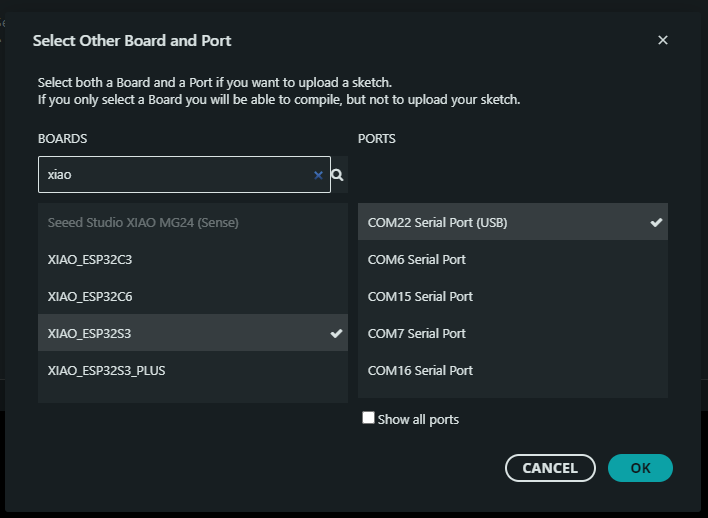
- Select the Right Board: Go to Tools → Board → ESP32 → Select XIAO ESP32S3
- Go to Tools → Enable "USB CDC On Boot"
- Connect Your Xiao ESP32 via USB-C cable
- Select the Port: Go to Tools → Port and choose the COM port labeled with “ESP32 S3”
- Upload the Code: Click the Upload button
- Wait for the code to compile and upload.
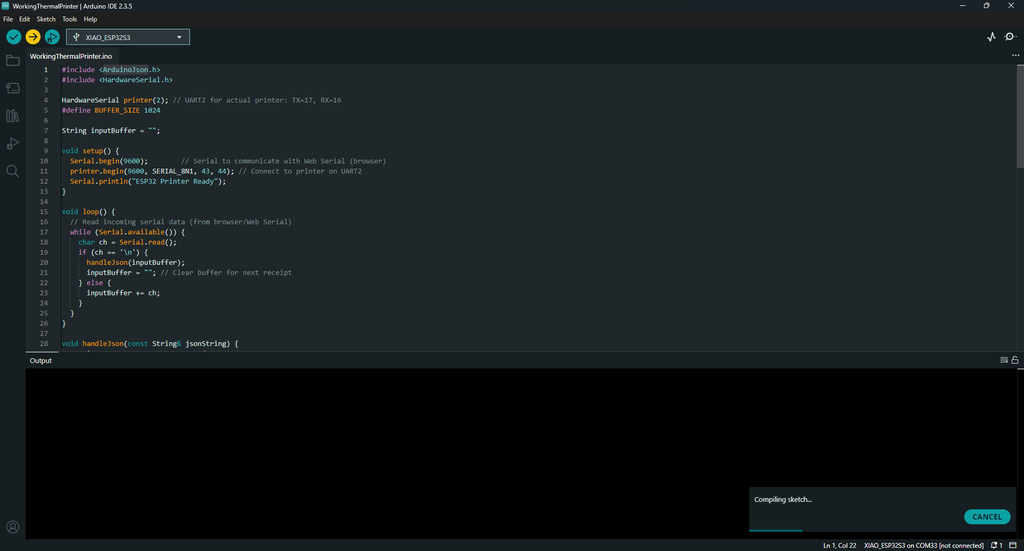 After upload, your ESP32 will be ready to receive print commands from the Open Kiosk system and drive the thermal printer via UART.
STEP 10: Connecting Xiao ESP32 to the Thermal Printer
 To send print data from the Xiao ESP32 S3 to the thermal printer, follow the wiring diagram and steps below.
Use the 5-pin connector that comes with your thermal printer to make the connections. Reference the wiring diagram you provided:
To send print data from the Xiao ESP32 S3 to the thermal printer, follow the wiring diagram and steps below.
Use the 5-pin connector that comes with your thermal printer to make the connections. Reference the wiring diagram you provided:
- GND ~ GND
- Pin 43 ~ TX
- Pin 44 ~ RX
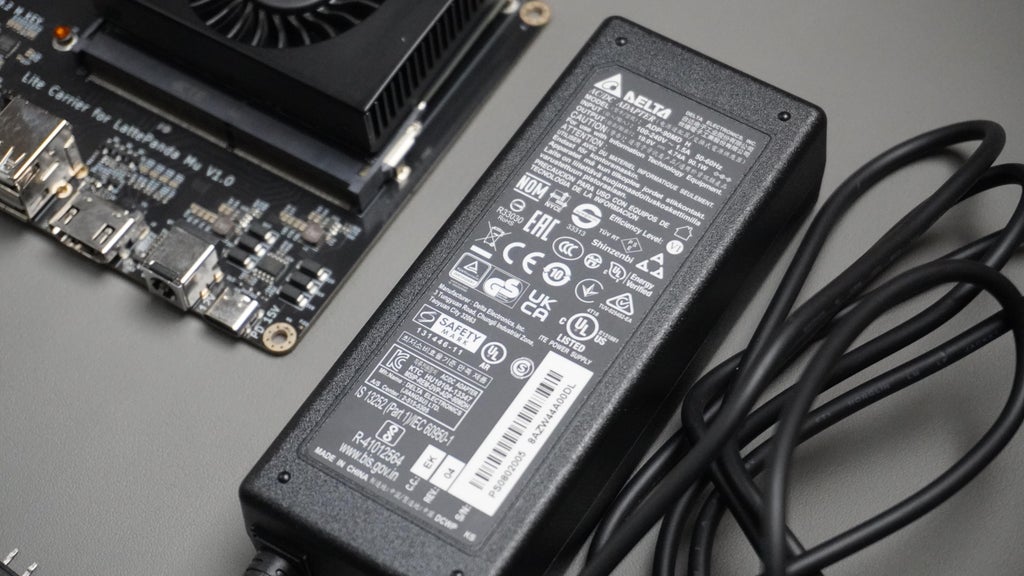
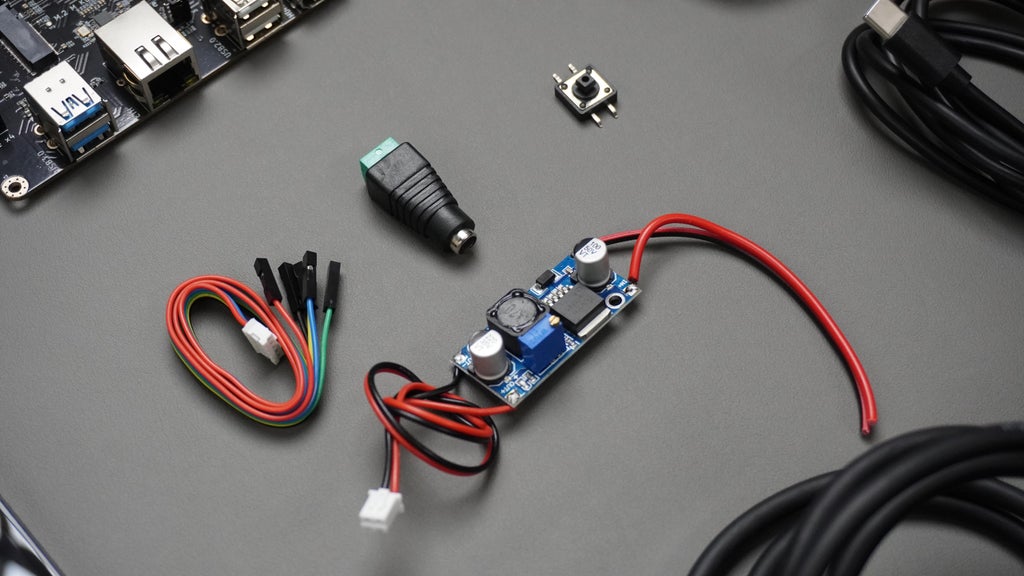
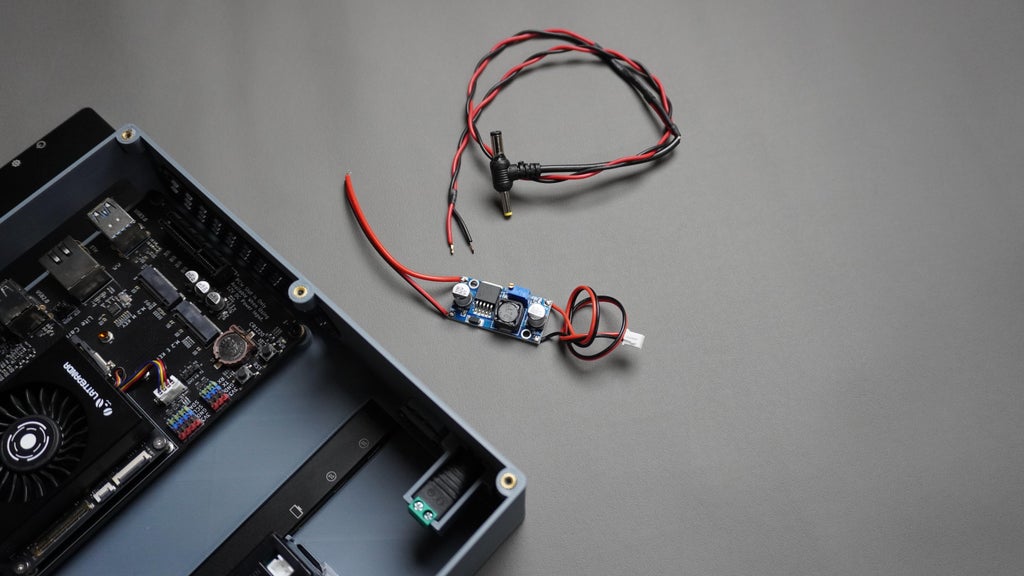
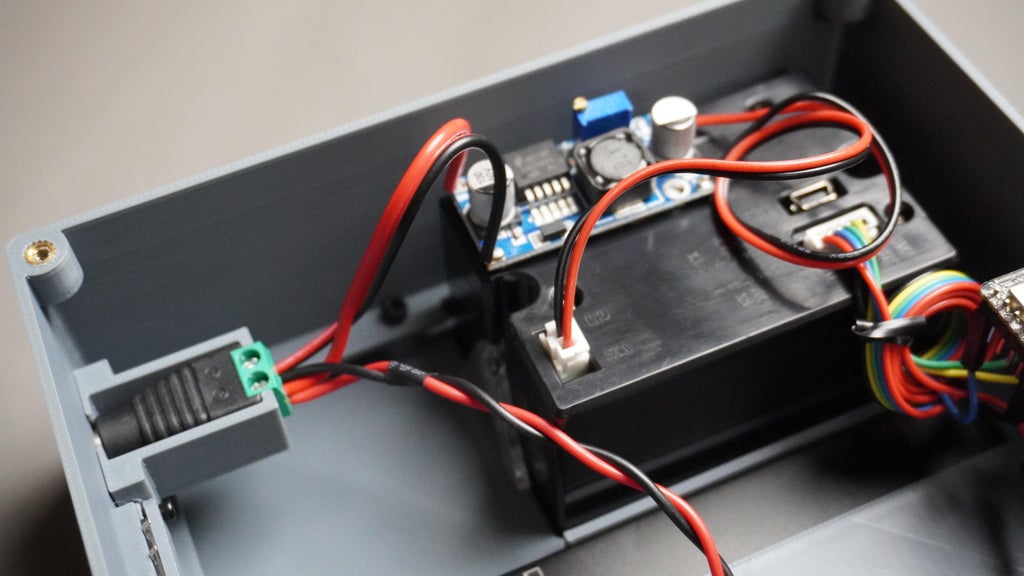
STEP 11: Connecting Power
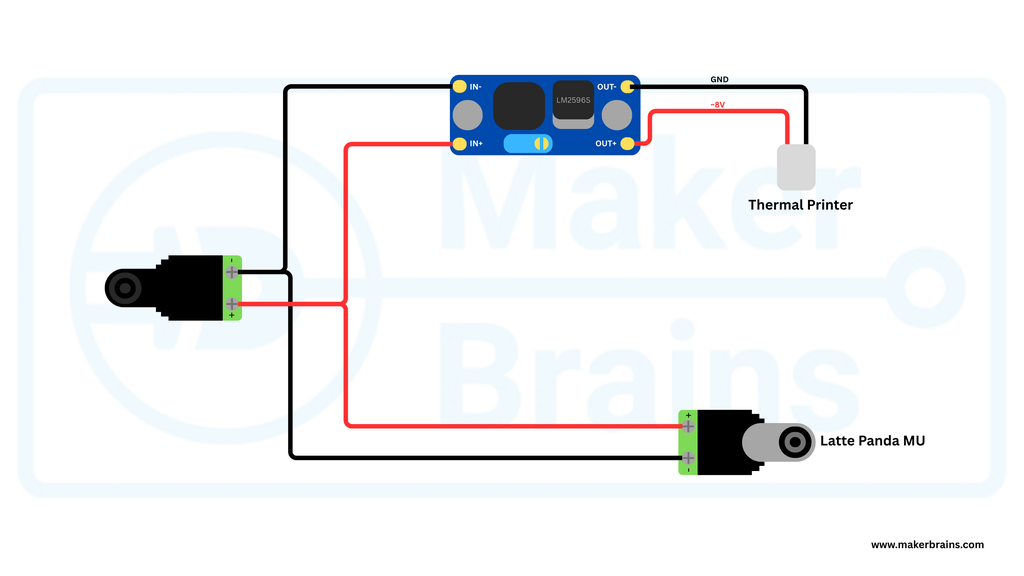
 This step ensures power delivery to both the LattePanda MU and the thermal printer from a single 19V power supply.
Required Parts
- Male DC Connector (connects to MU)
- DC Female Connector (already mounted on enclosure)
- LM2596 Buck Converter Module
- 2-pin JST Connector (Included with printer)
- Multimeter (to set voltage)
From the female connector, split the power wires:
- One pair goes directly to the LattePanda MU via the male DC connector.
- One pair goes into the IN+ / IN− of the LM2596 module.
Step-Down Conversion for Printer:
- Adjust the LM2596 output to ~8V using a multimeter and the onboard potentiometer.
Power Connection
- Connect OUT+ / OUT− to the 2-pin JST going to the thermal printer.
- Plug the 2-Pin JST Connector into the thermal printer’s power input.
- Connect the Male DC Barrel Jack to the LattePanda MU’s DC input port.


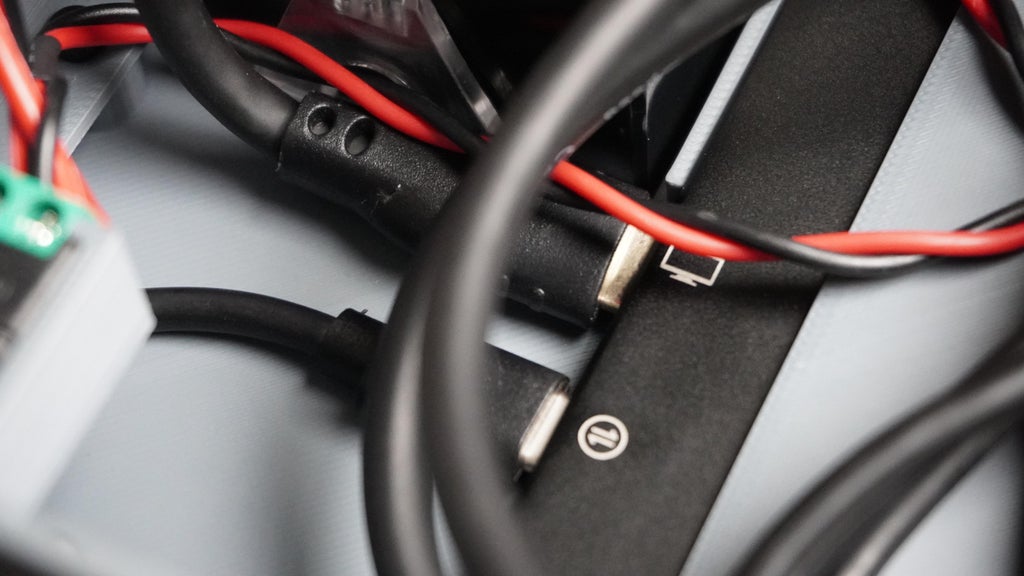
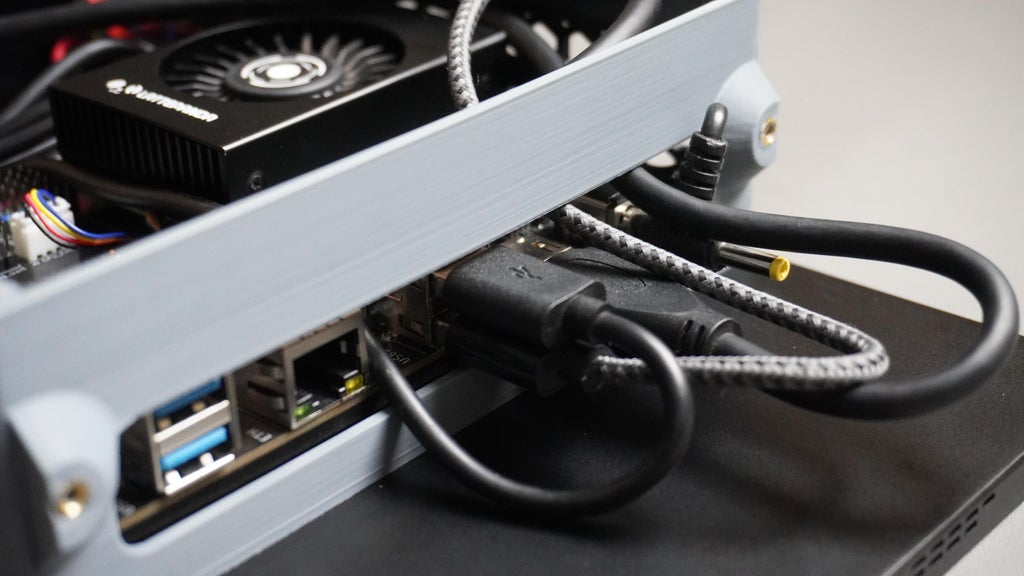
STEP 12: Connecting Display & ESP32

- Connect an HDMI cable from the LattePanda MU HDMI port to the Micro HDMI port on the Touch Display. This handles the video signal.
- Use a USB Type-A to Type-C cable to connect from the LattePanda MU USB Type-A port to the Touch Display Type-C port. This supplies power to the display.
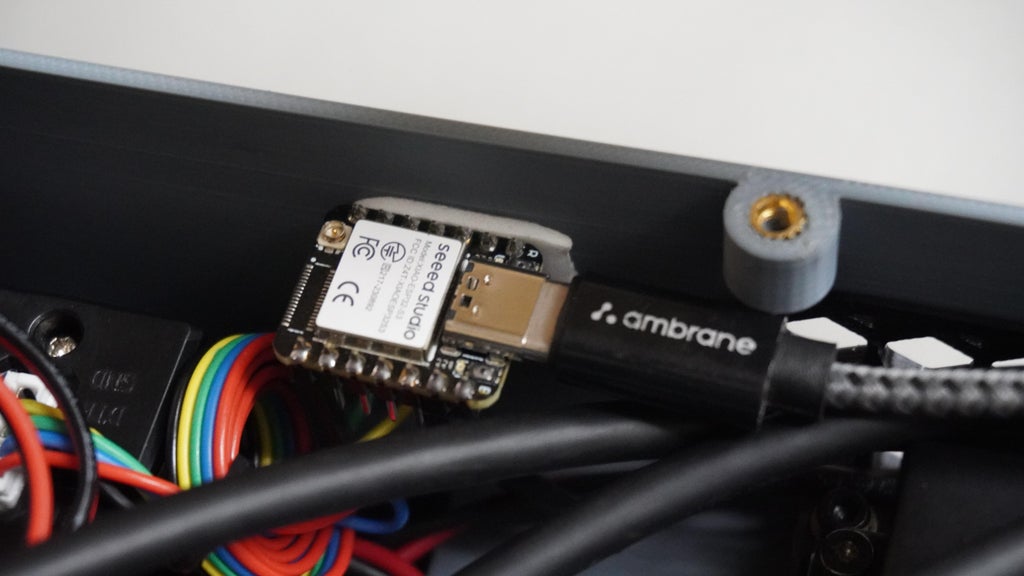
- Use a USB Type-A to Type-C cable to connect the ESP32 Type-C port to another USB Type-A port on the LattePanda MU. This powers ESP32 and allows the MU to communicate with and program the ESP32.

STEP 13: Extending the Power Button
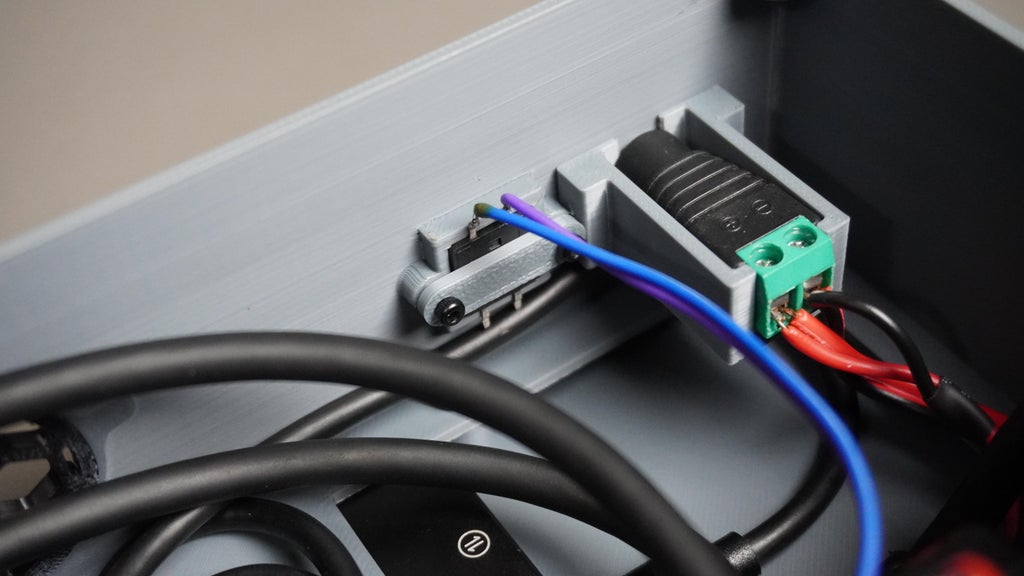
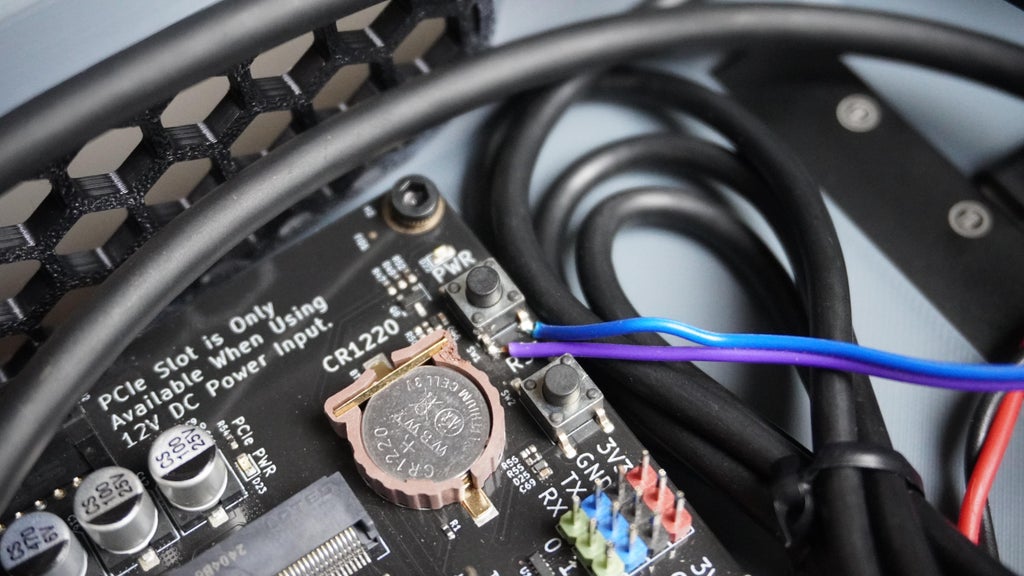 What You Need:
- 2 wires
- Soldering iron
- Patience and a steady hand
Instructions:
- Find the power button on the LattePanda MU.
- Cut two wires to the appropriate length to reach from the enclosure button to the MU’s power button header.
- Solder one end of each wire to the push button on your enclosure.
- Then, carefully solder the other ends to the MU power button.
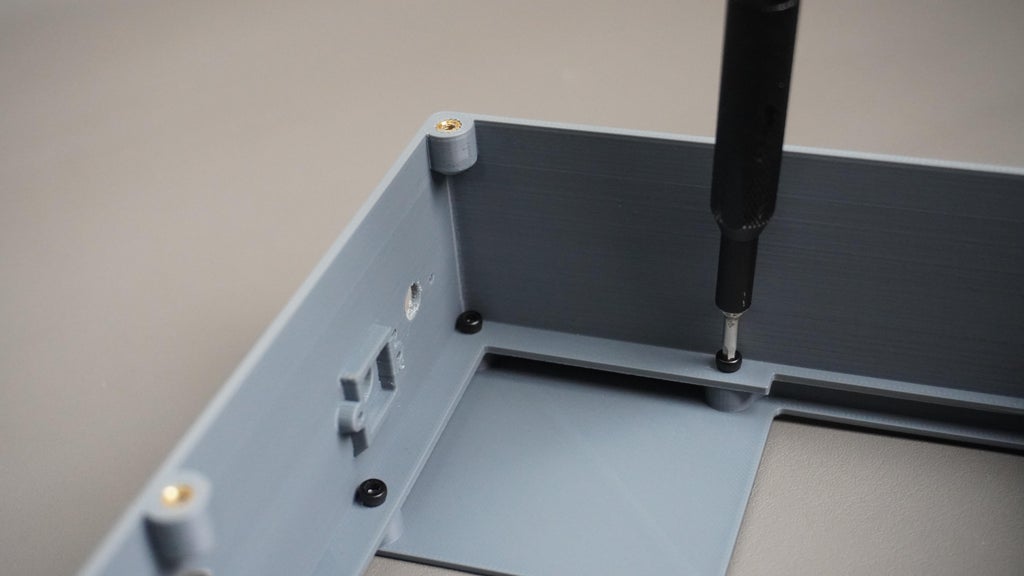
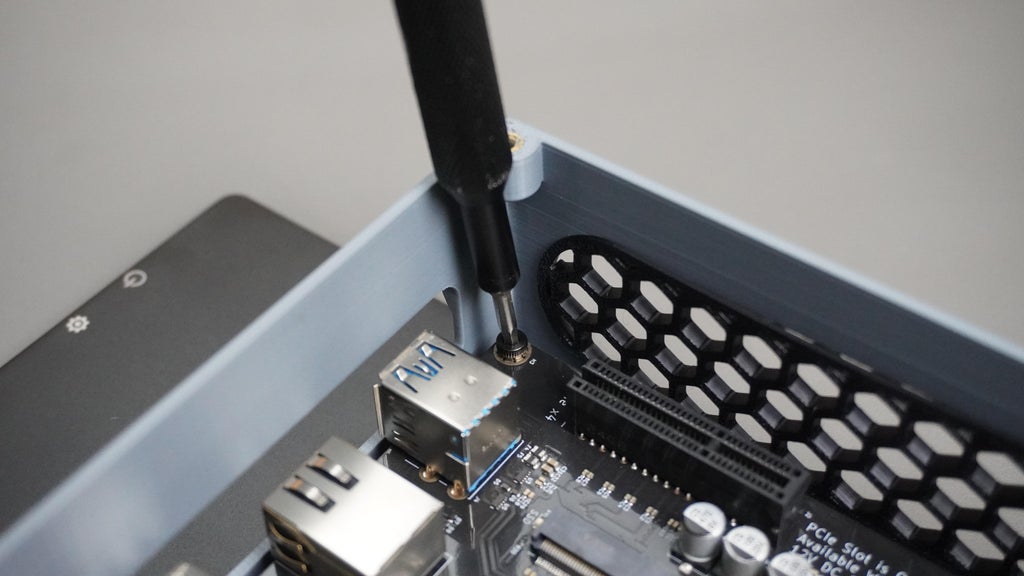
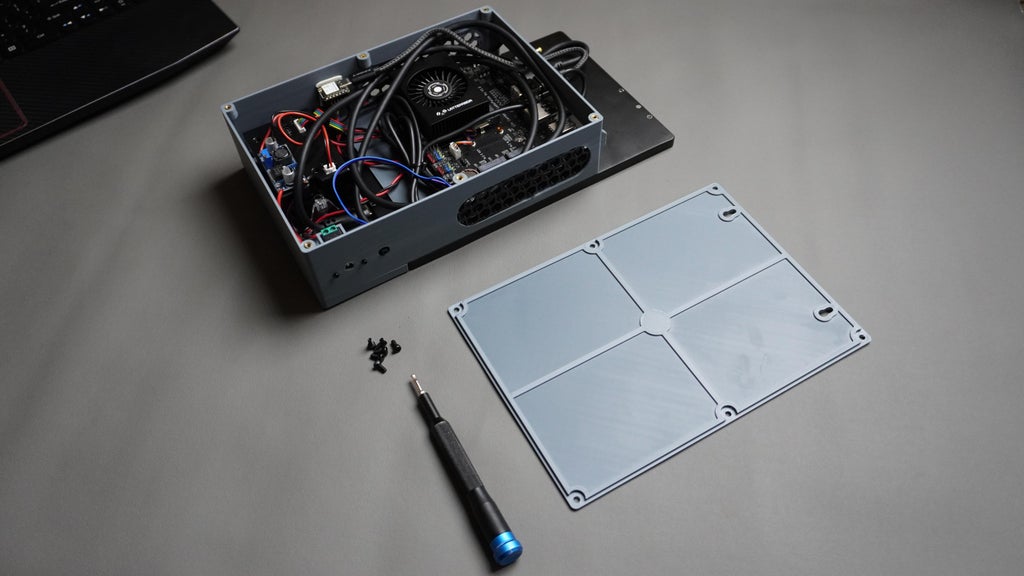
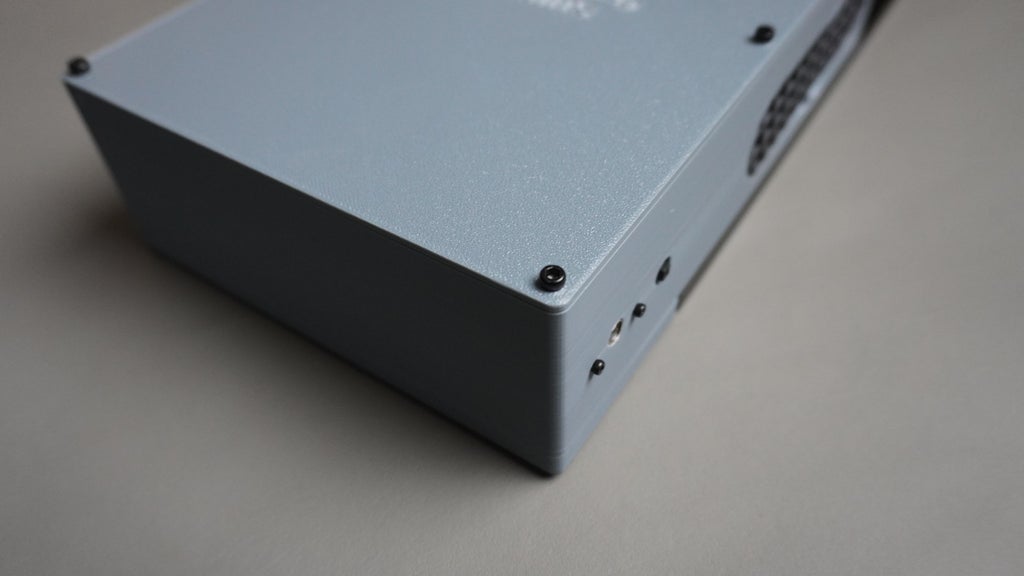
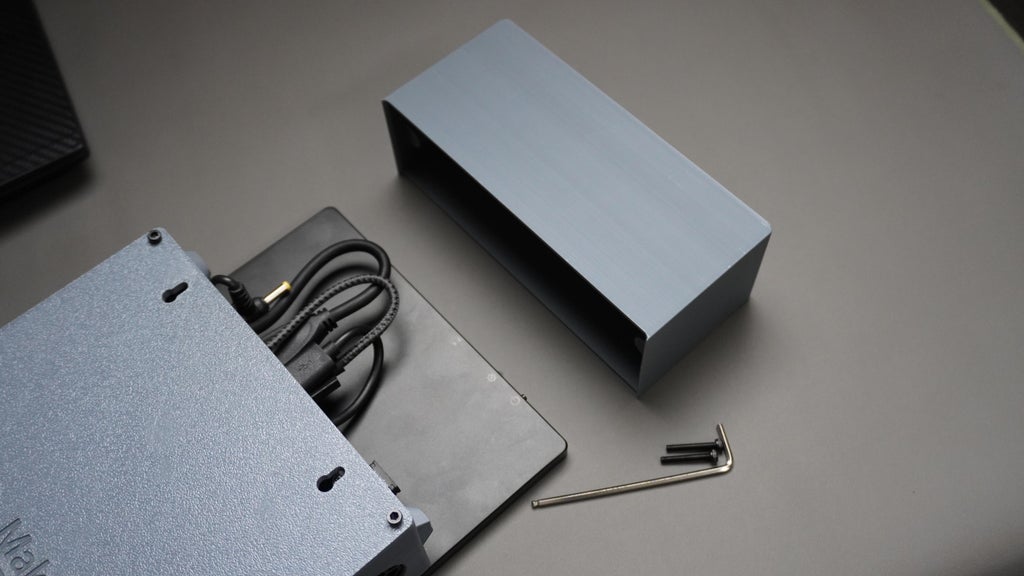
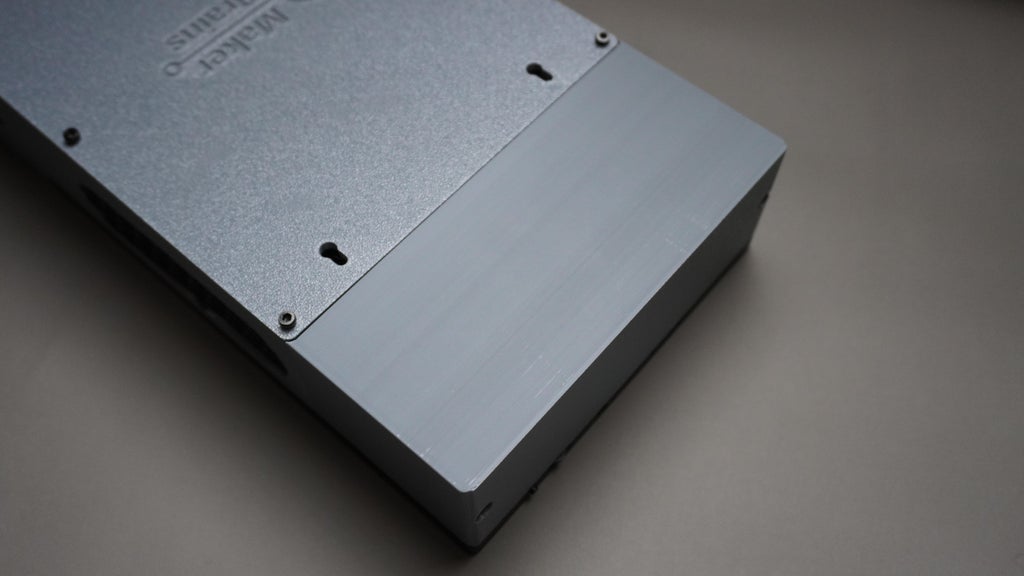
STEP 14: Enclosure Cover Assembly

- Take the enclosure cover and carefully align it over the housing.
- Make sure that all holes in the cover line up with the threaded inserts on the housing.
- Use 6x M3x6mm screws and use a screwdriver to gently but firmly tighten the screws.
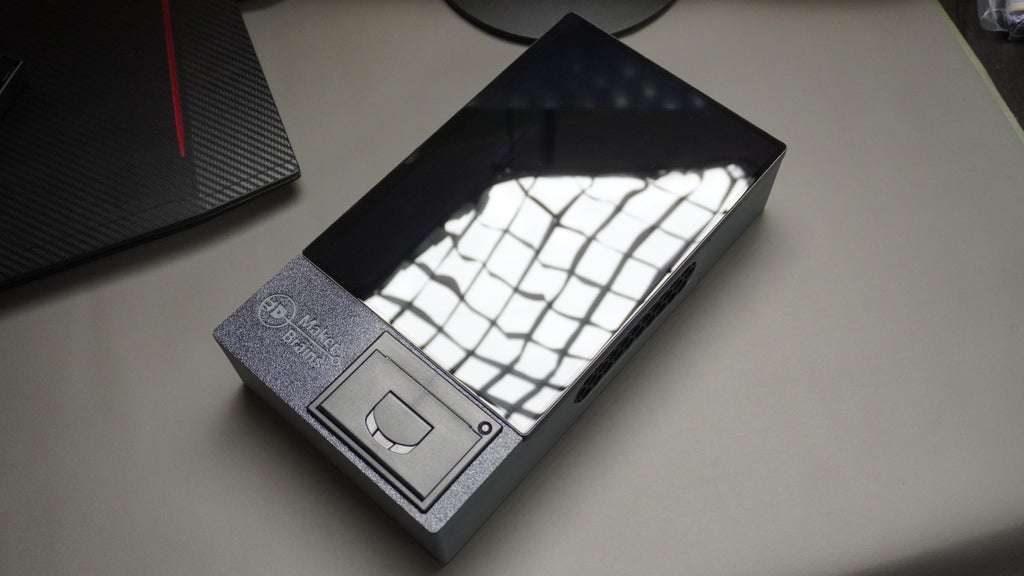
STEP 15: Assembling Top Cover

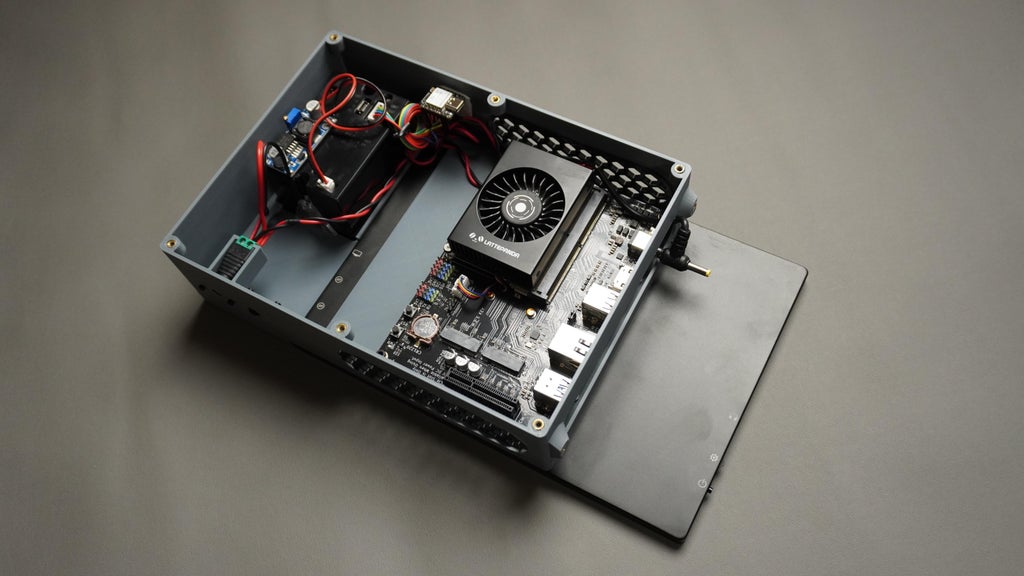
- Since the LattePanda MU doesn't have a built-in WiFi card, we are using a WiFi USB dongle.
- Plug the USB dongle into one of the available USB ports on the MU (preferably a USB 3.0 port for better performance if available).
- Take the Top Cove, align it with the enclosure assembly, ensuring that no cables are in the way and the screw holes are properly lined up.
- Use 2x M3x16mm screws and an L-key (hex key/Allen wrench) to tighten them securely.

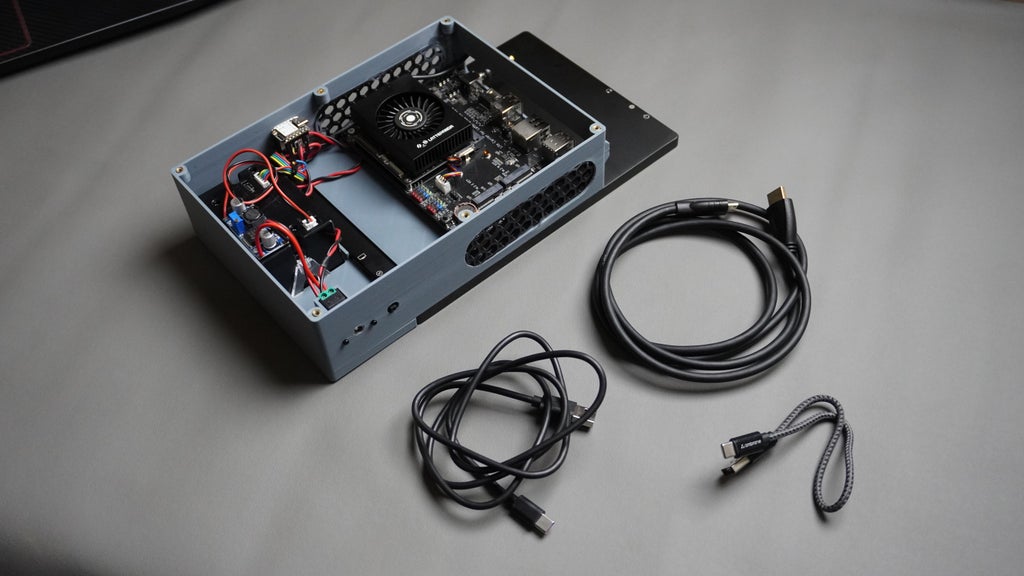
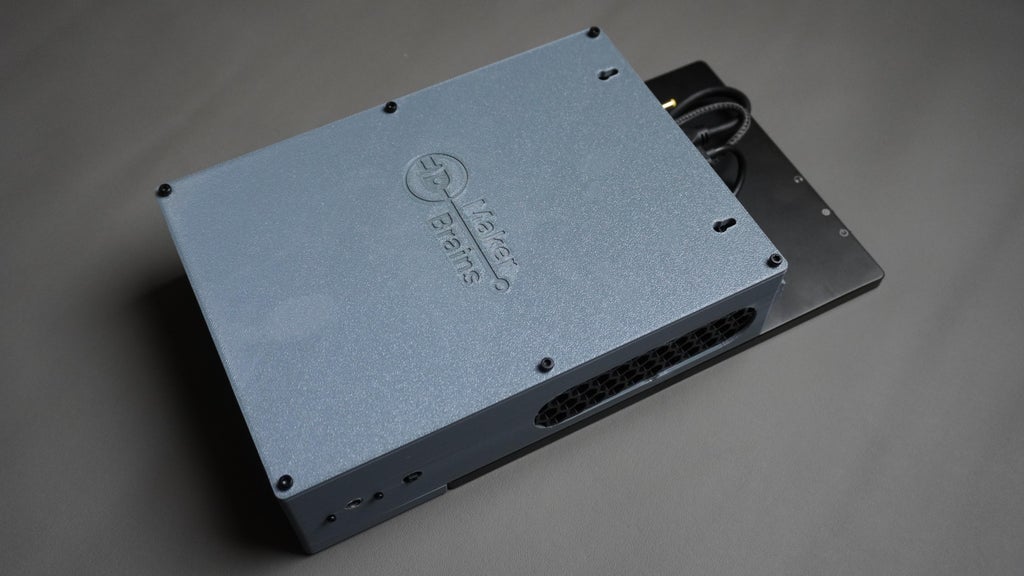
That is it, our hardware assembly is complete!

STEP 16: Power ON

- Plug in the 19V Power Supply that came with our LattePanda MU kit into the female DC jack on our assembled enclosure.
- Press the external power button.
- Wait a few seconds, the LattePanda MU should begin booting up.
- The display should turn on, and if connected properly, your thermal printer should be powered and ready.
No power?
- Check the DC adapter is firmly connected.
- Make sure all power connections (especially the LM2596 module) are secure.
- Verify the LM2596 is still outputting ~8V to the printer.
Display not turning on?
- Confirm HDMI and Type-C power to the display are connected.
- Double-check that the LattePanda MU is booting (look for fan or LED indicators).
Thermal printer not working?
- Ensure the JST connector is seated properly.
- Verify the LM2596 output again with a multimeter.


STEP 17: Software Download & Installation
This step covers everything you need to get Open Kiosk running on your Windows 11-powered LattePanda MU device.
Initial Windows Setup
- Before setting up the kiosk app, make the following adjustments to your Windows settings:
Set Screen Orientation
- Go to Settings → System → Display
- Scroll down to Display Orientation
- Set it to Portrait for vertical kiosk layout
Enable On-Screen Keyboard
- Go to Settings → Accessibility → Keyboard
- Toggle On-Screen Keyboard to ON
- This ensures users can enter data using a touch interface.
Install Chrome Browser (for Kiosk Mode)
- Chrome supports true fullscreen kiosk mode, perfect for POS displays.
- Download and install Chrome from: https://www.google.com/chrome
Download the Software
- Visit the Open-Kiosk Releases
- Download the file:
- Open.Kiosk.zip
Install Python
- Head to python.org and:
- Download the latest stable version for Windows
- Run the installer Make sure to check “Add Python to PATH” during installation
Set Up the Application After downloading:
- Extract the Open-Kiosk.zip file to a folder of your choice (e.g., C:\OpenKiosk)
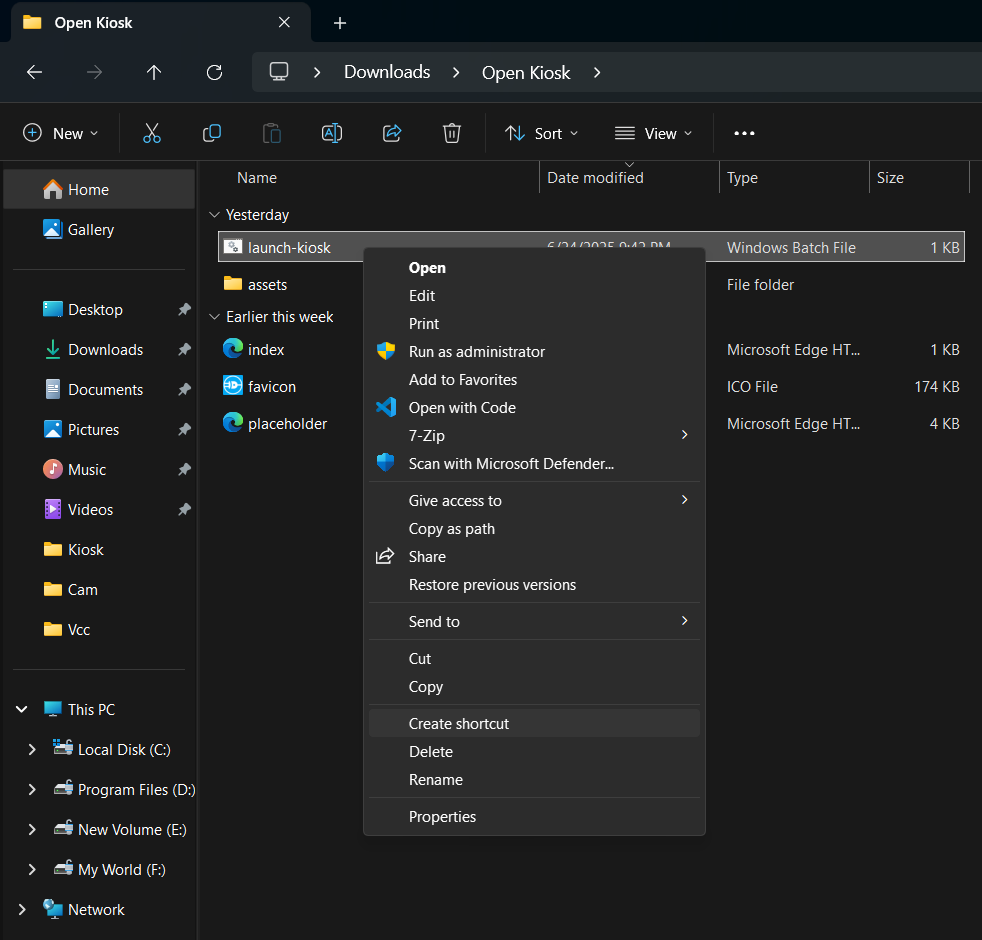
Edit the Launcher:
- Open launch-kiosk.bat in a text editor (e.g., Notepad)
- Update the path to point to your extracted folder
- Save the file
Example line you might edit:
@echo off
cd /d "C:\Users\mukes\Open Kiosk"
start "" cmd /k "python -m http.server 8080"
timeout /t 2
start "" "C:\Program Files\Google\Chrome\Application\chrome.exe" --kiosk "http://localhost:8080"
:: start "" msedge.exe --start-fullscreen --app="http://localhost:8080"
Replace "C:\Users\YourName\Open Kiosk" with your actual extracted folder path.
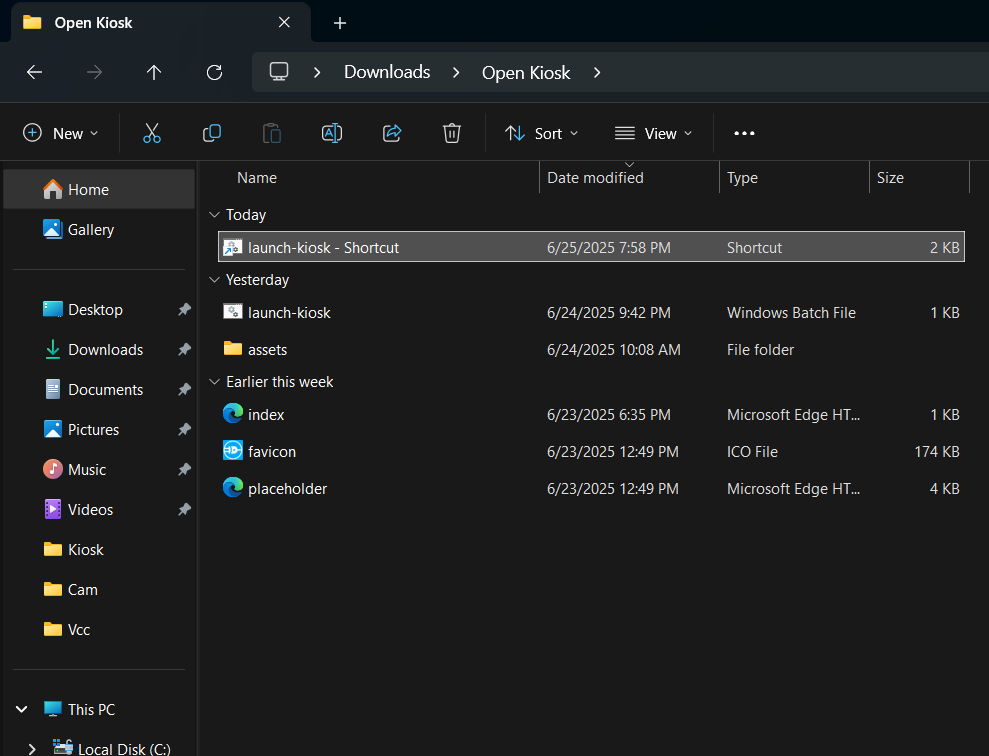
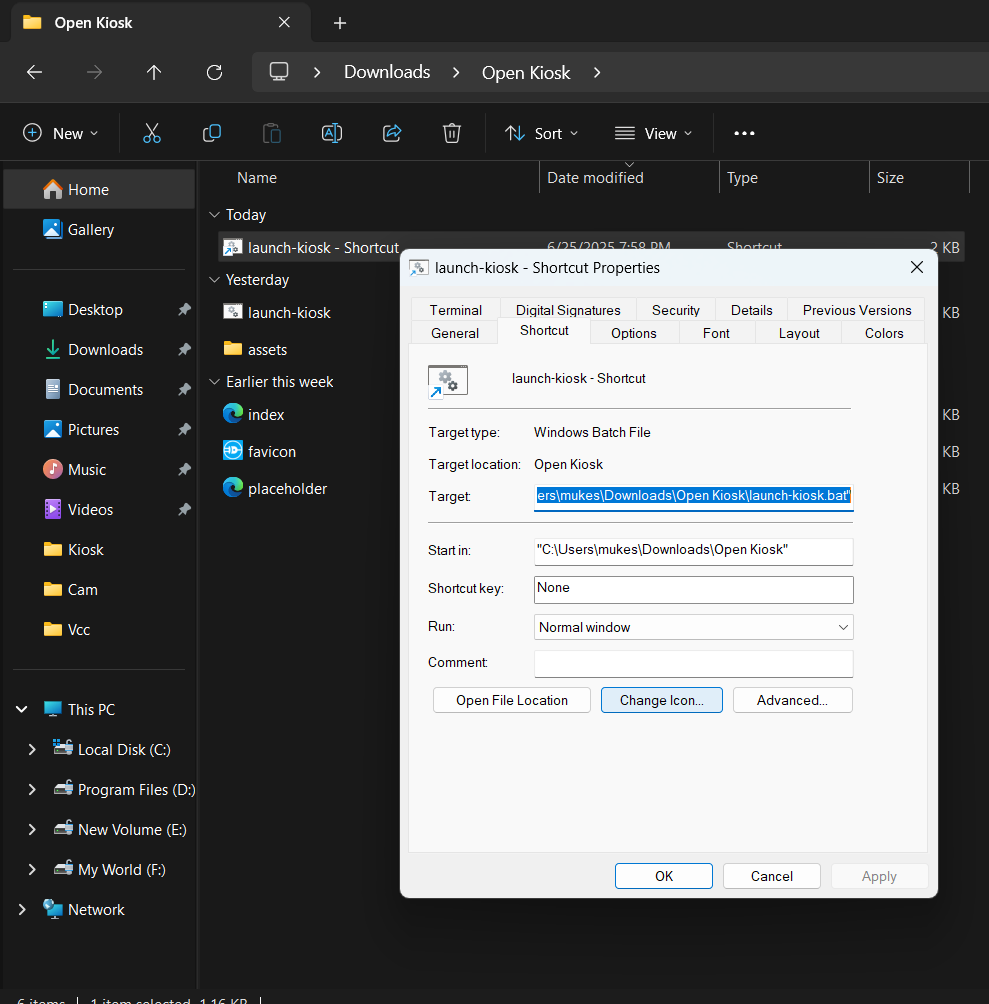
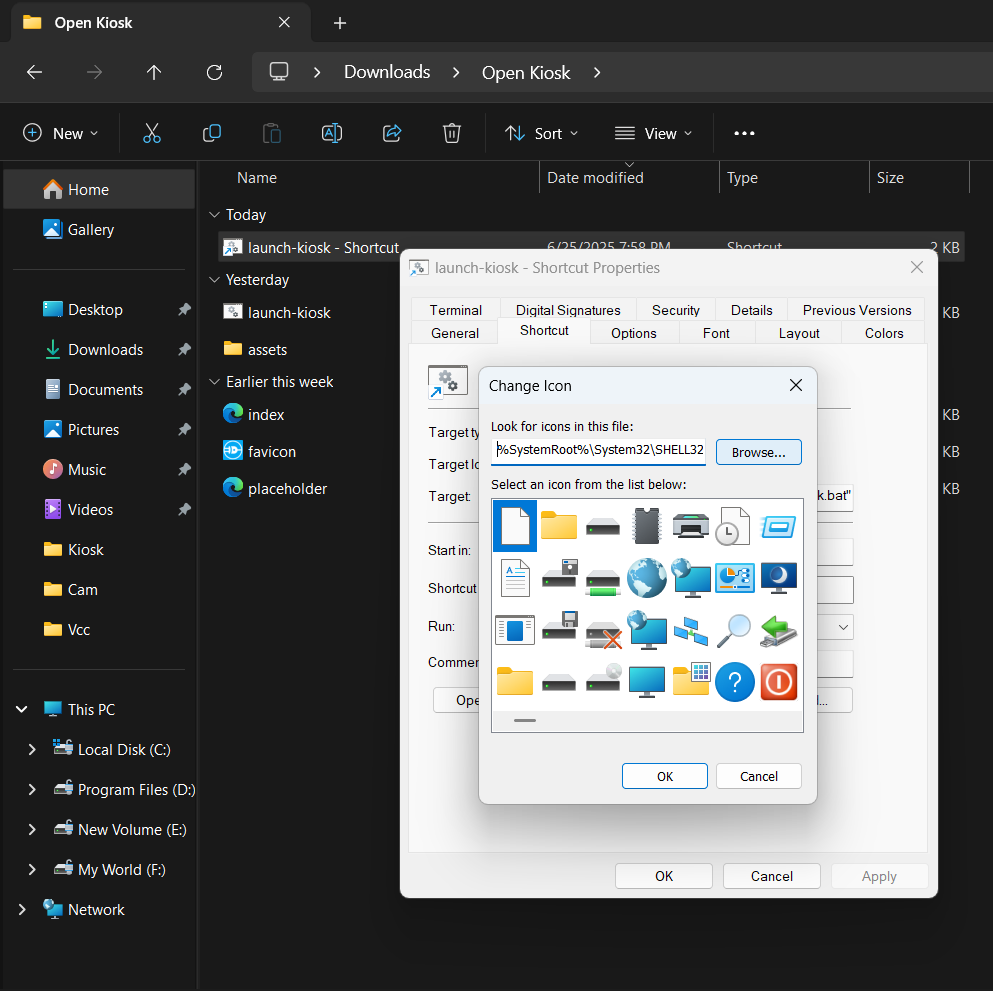
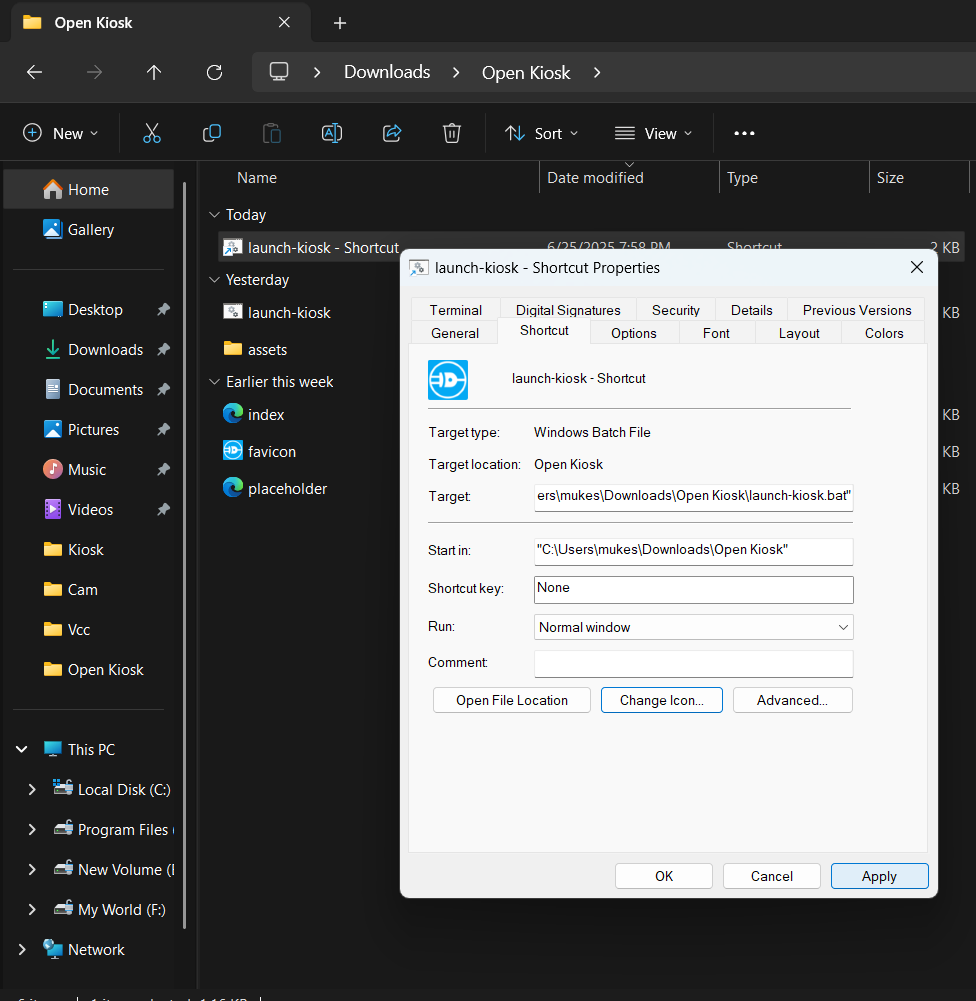
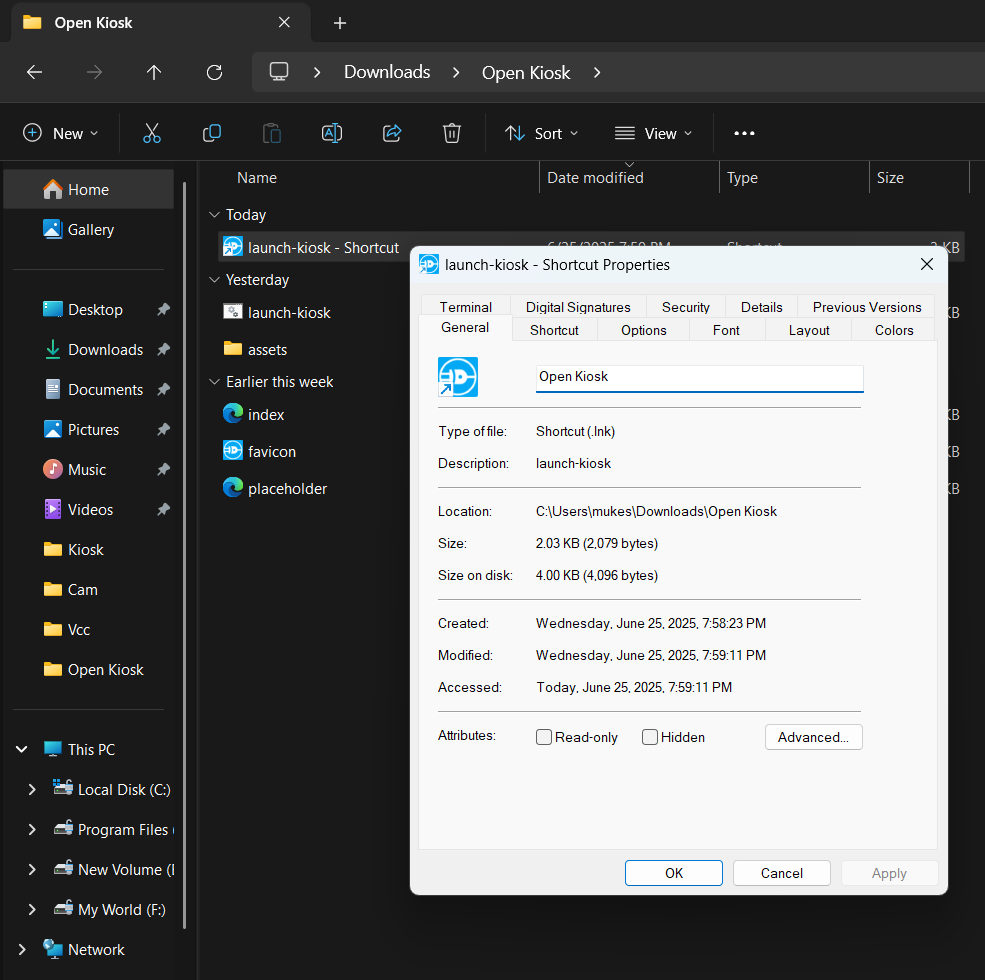
Create a Desktop Shortcut
- Right-click launch-kiosk.bat → Create shortcut
- Right-click the new shortcut → Properties
- Click Change Icon → Choose icon from the extracted folder favicon.ico
- Rename the shortcut to 👉 Open Kiosk
- Drag or copy the shortcut to your Desktop or Home screen


 ✅ Done!
STEP 18
Initial Store Setup
Once everything is powered and running:
Launch the App
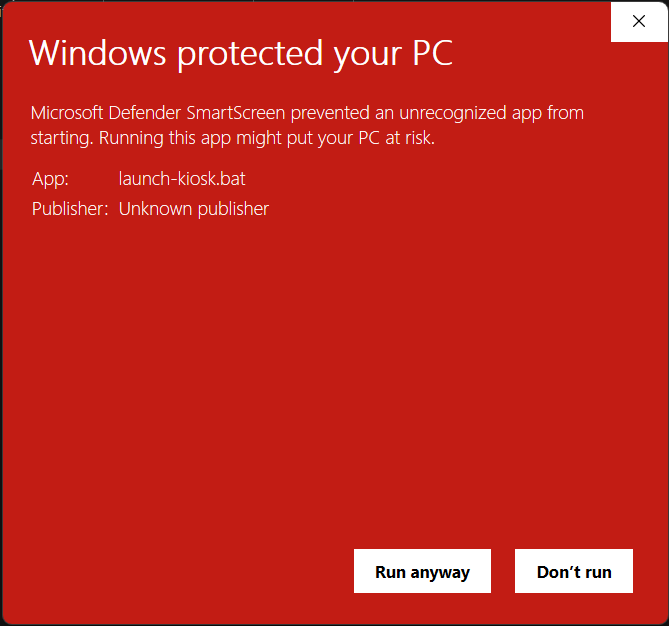
- Double-click the Open Kiosk desktop shortcut you created earlier.
- If You Get Warning the click on run Anyway.
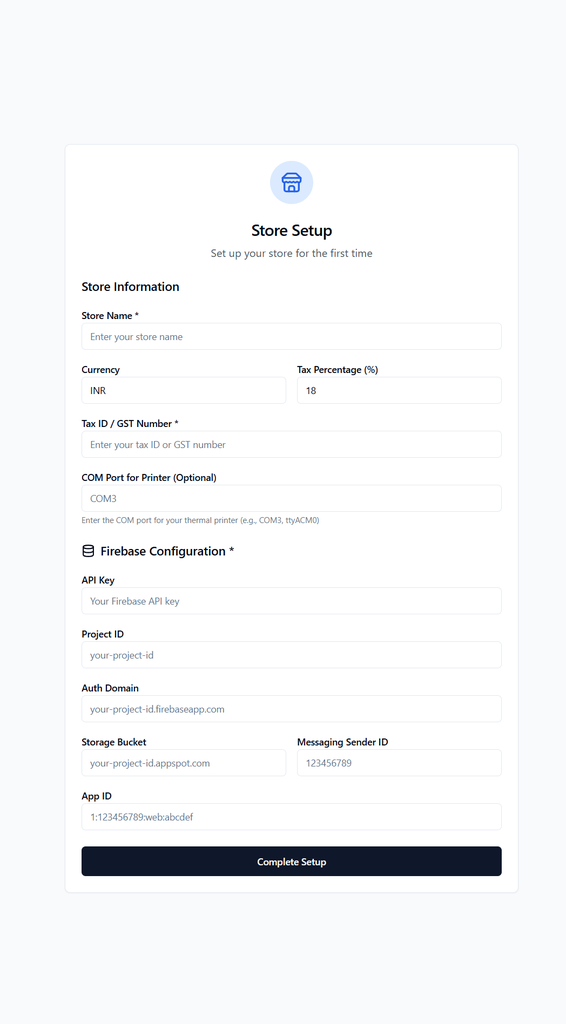
- You will be presented with the Initial Store Setup screen (as shown in the image).
Fill Store Information
- Store Name ~ Your business/store name
- Currency ~ e.g., INR, USD, etc.
- Tax Percentage (%) ~ e.g., 18
- Tax ID / GST Number ~ Your tax ID or GST number
- COM Port for Printer (Optional) ~ e.g., COM3 (Check in Device Manager -> Ports) (Only if using a thermal printer)
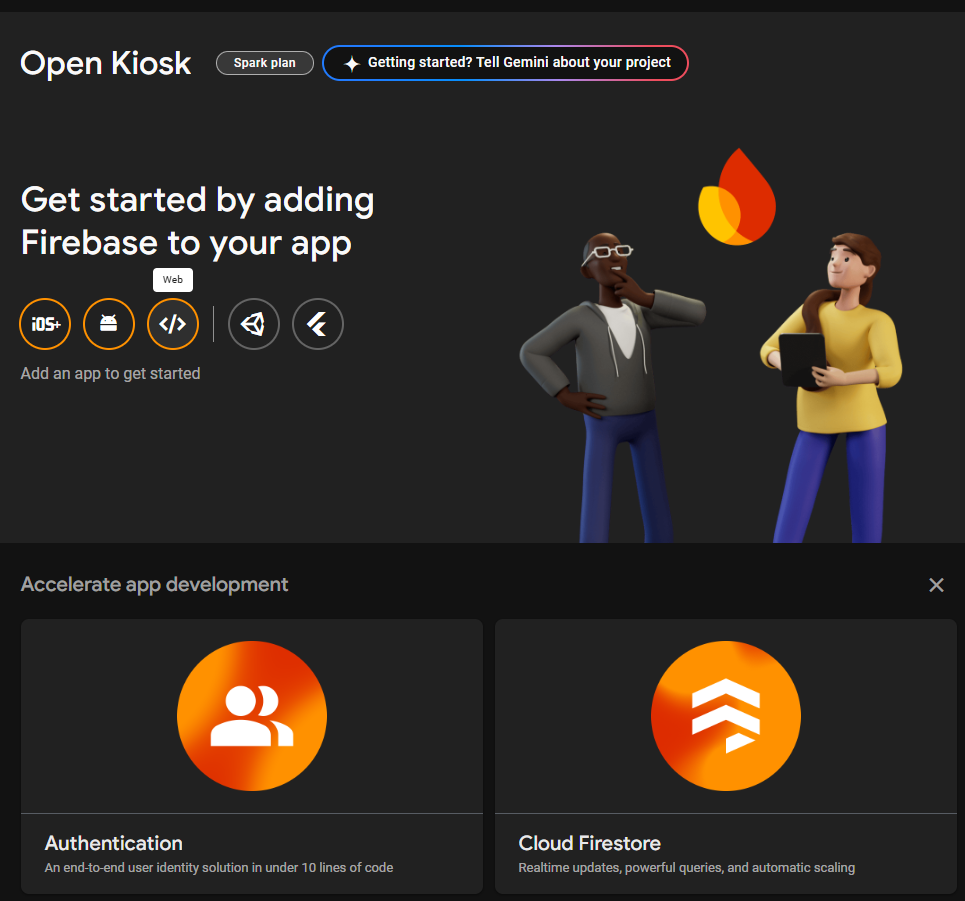
Firebase Configuration Setup
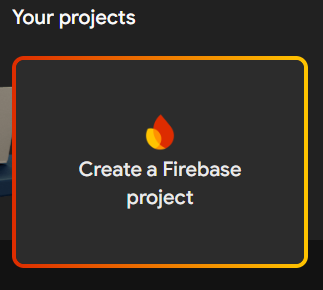
- Go to 👉 https://console.firebase.google.com
- Log in with your Google account
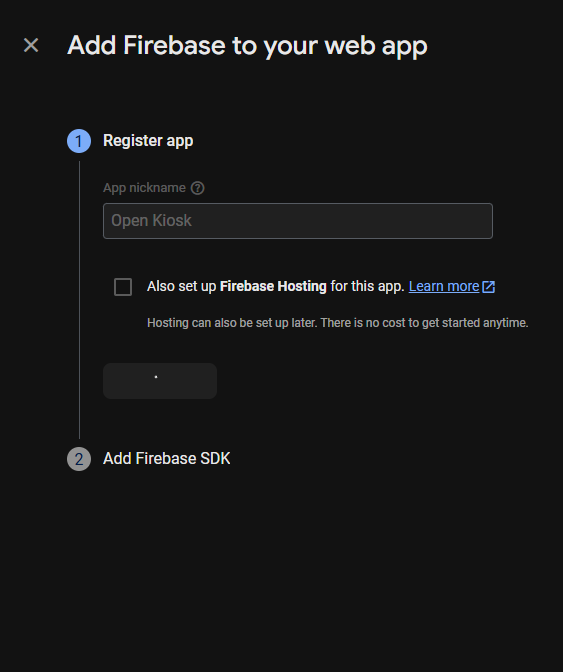
- Click “Add Project” → Create a new Firebase project
- Under “Your Apps” → Add App → Web
- Register your app (e.g., open-kiosk-app)
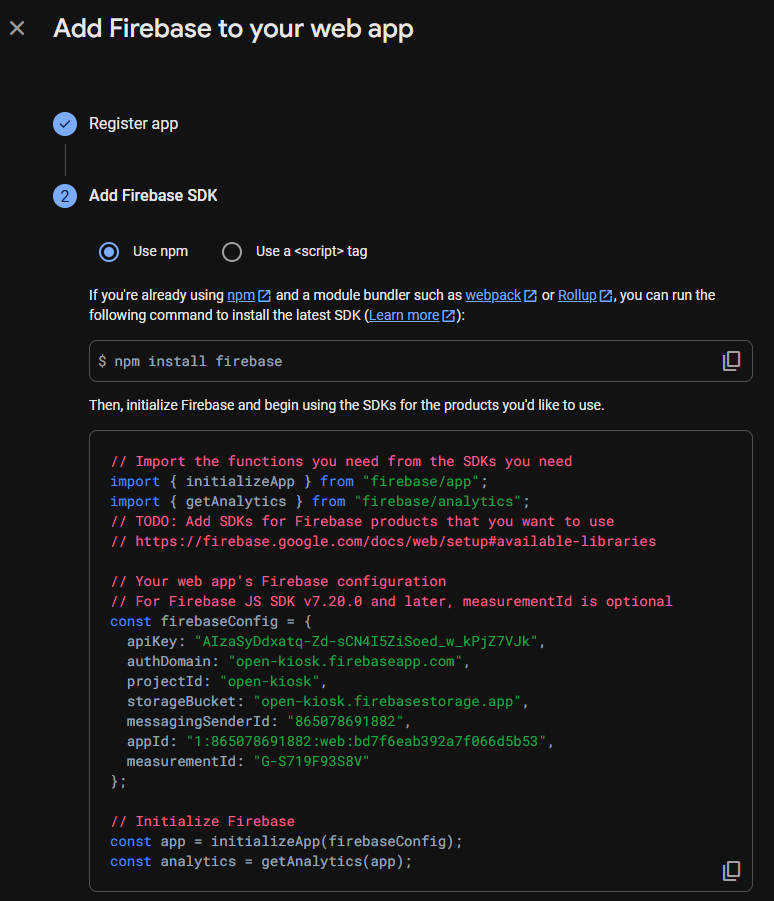
- Copy these values from the SDK config and paste them into the setup form:
- API Key ~ apiKey field
- Project ID ~ projectId
- Auth Domain ~ authDomain
- Storage Bucket ~ storageBucket
- Messaging Sender ID ~ messagingSenderId
- App ID ~ appId
Once all values are entered, click “Complete Setup”
 Create Firestore Database
Go to Build → Firestore Database in Firebase
Click Create Database
Choose Start in Test Mode
Select your region and click Enable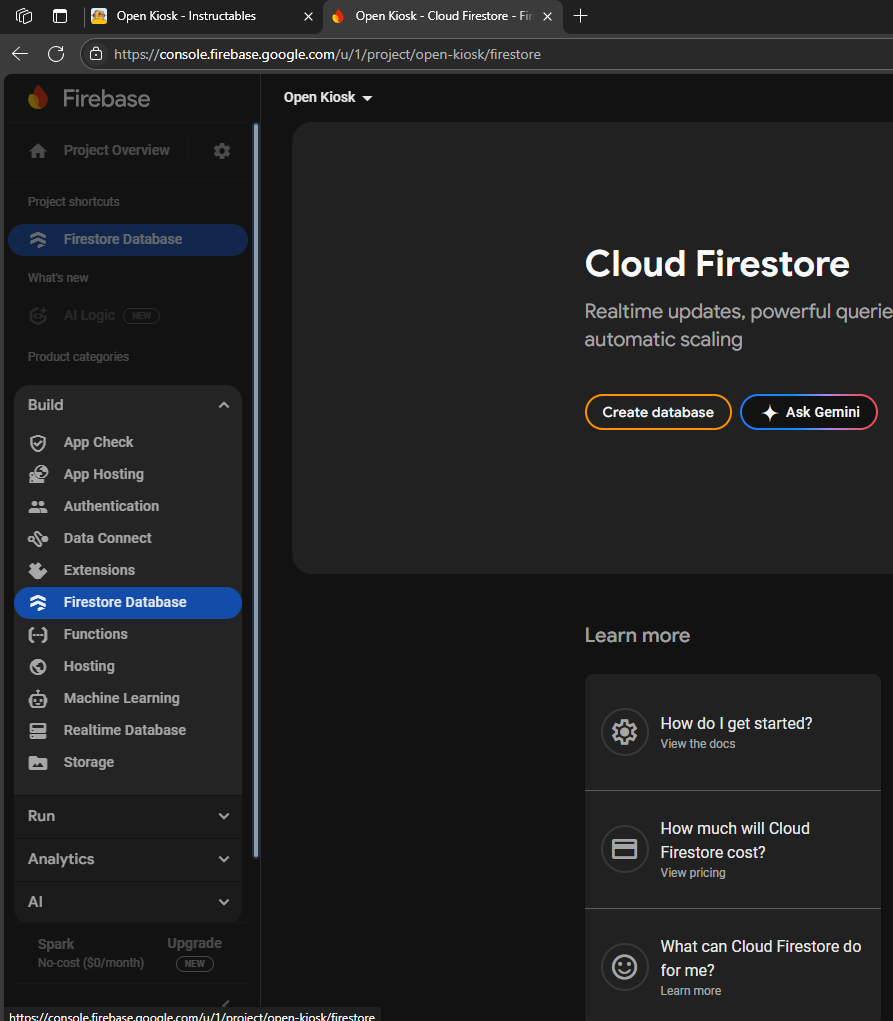

You are Done!
- You will be redirected to the Home Page, where you will see:
- Admin Card
- Shop Card
If anything doesn't work:
- Go to Admin Settings Page
- Review your Firebase and printer configurations
- Update and save again
STEP 19: How It Operates
 Once the setup is complete, the system operates through two panels:
Admin Panel The Admin Panel provides all backend controls for managing your store.
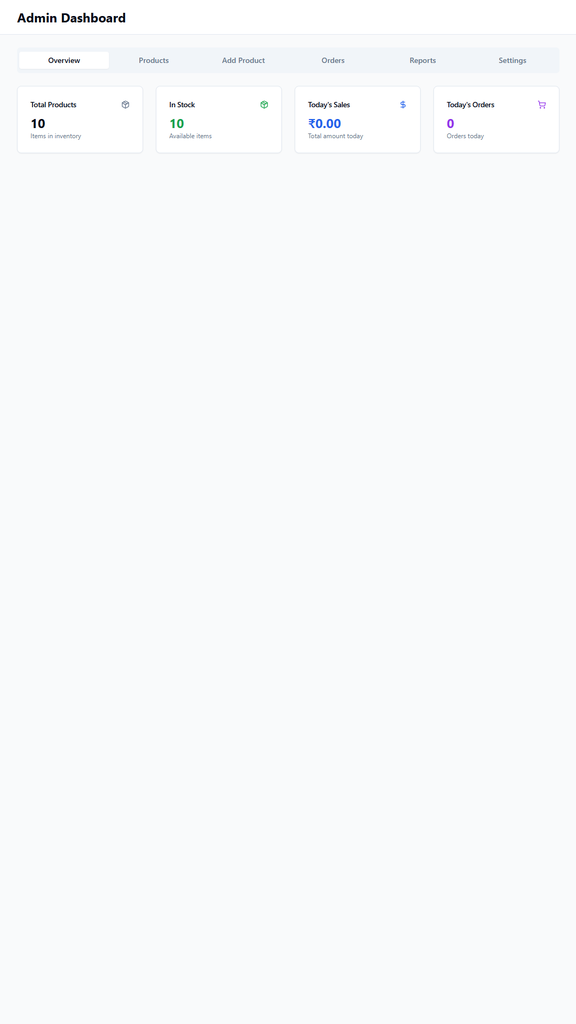
Page 1: Dashboard
- Total Products Count
- In-Stock Count
- Today’s Sales Amount
- Today’s Order Count
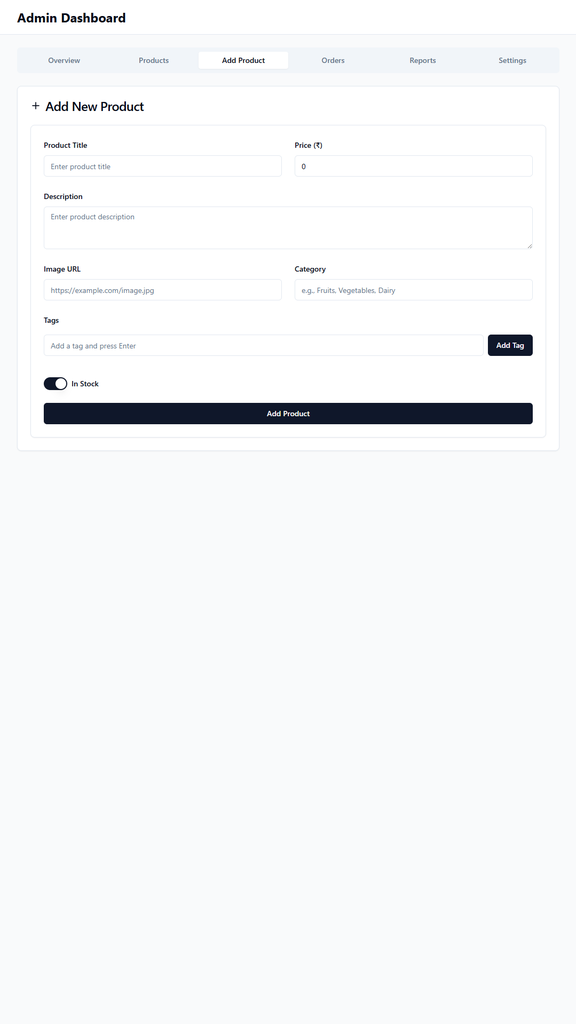
2: Add Product Add new products with:
- Title
- Description
- Image URL
- Category
- Tags (for better search results)
- In Stock toggle
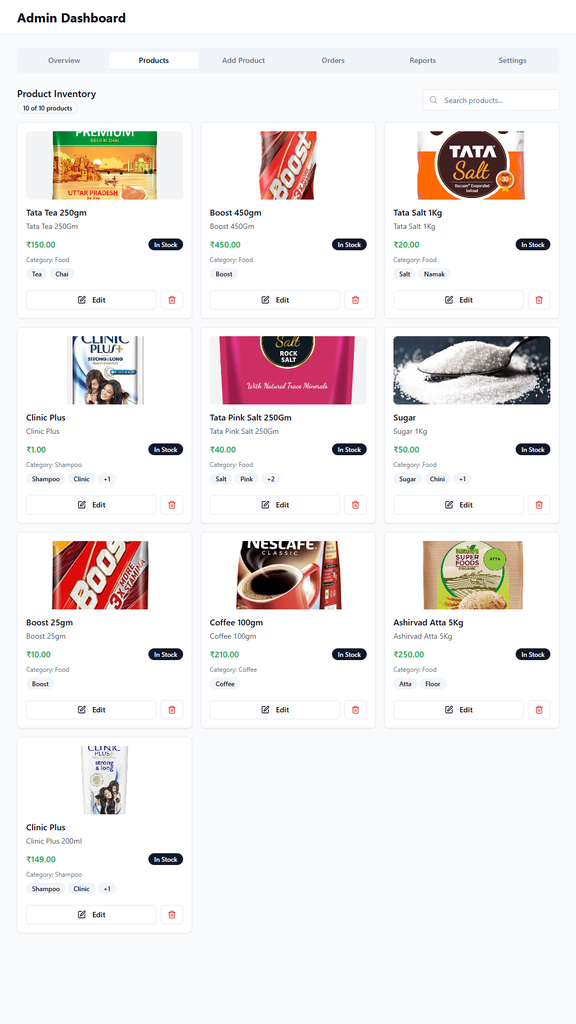
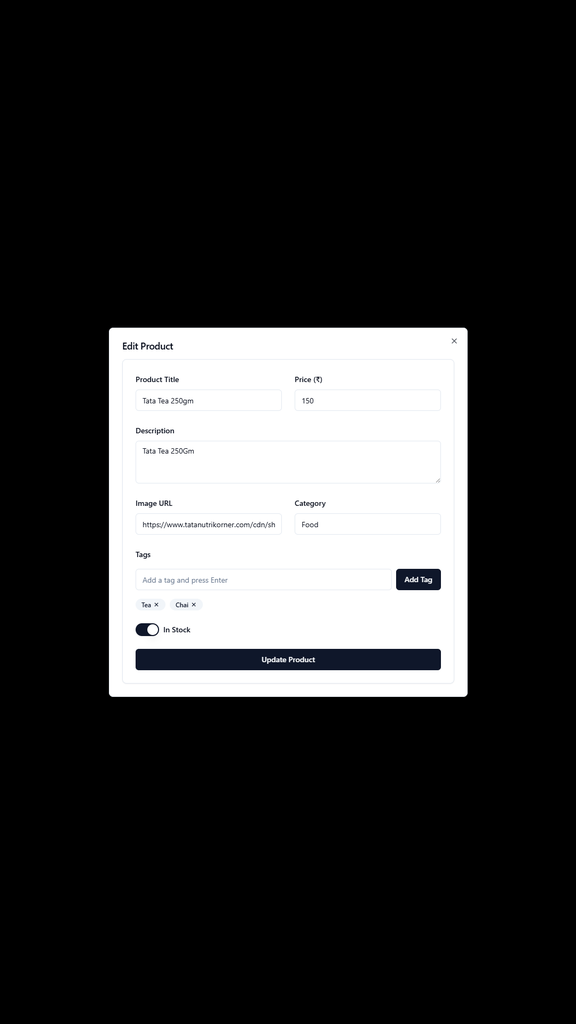
Page 3: Inventory
- View & update all existing products.
- Edit stock status, titles, or other info.
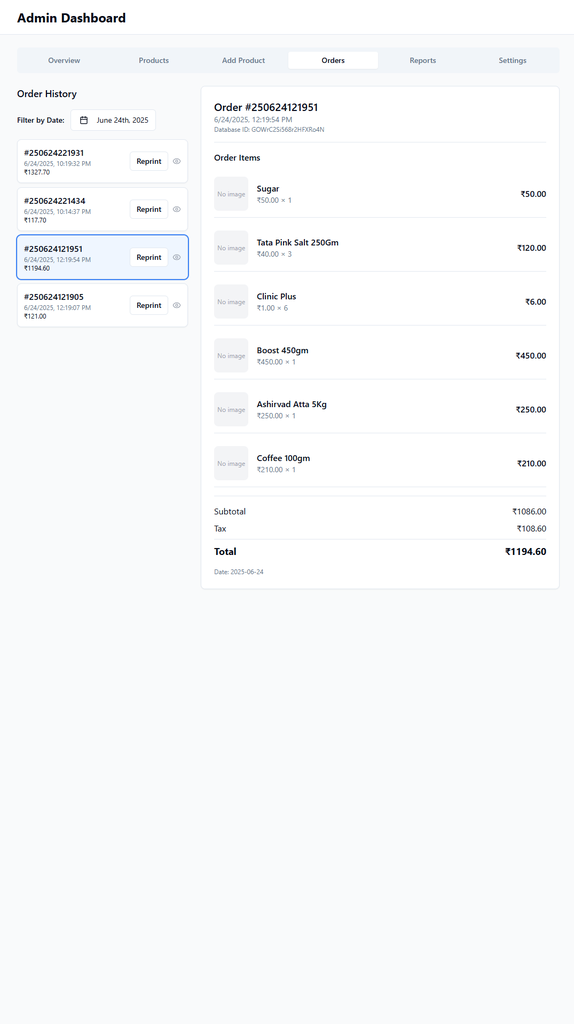
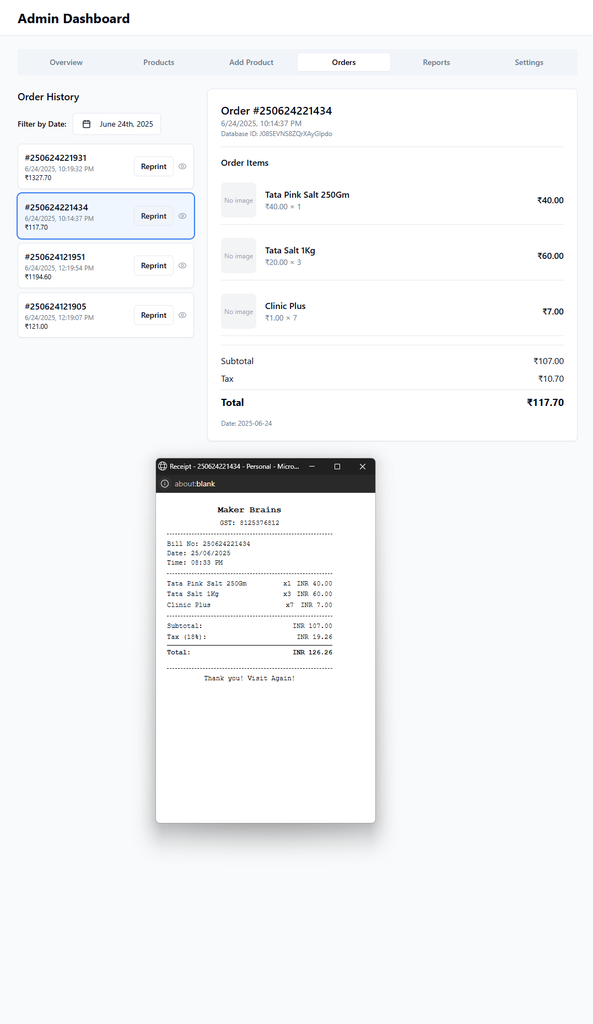
Page 4: Orders
- See full order history.
- Default filter: today’s orders
- Change date to view past records.
- Option to reprint bill in case of mishap.
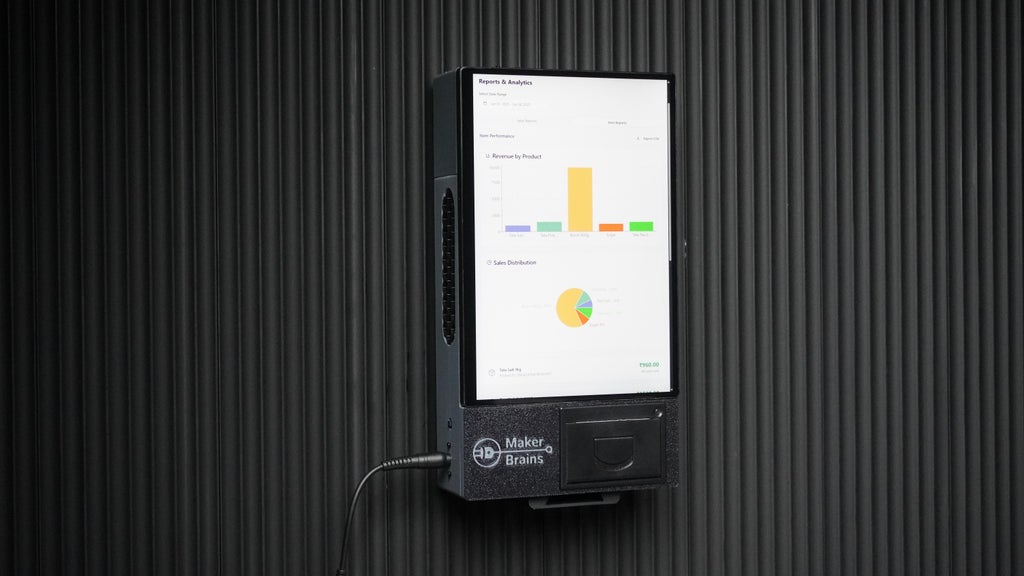
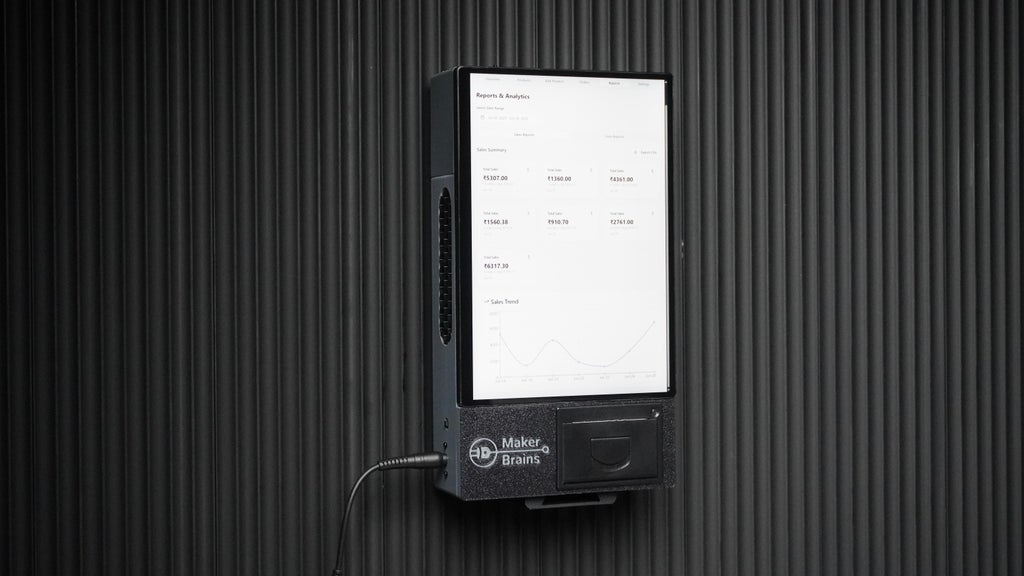
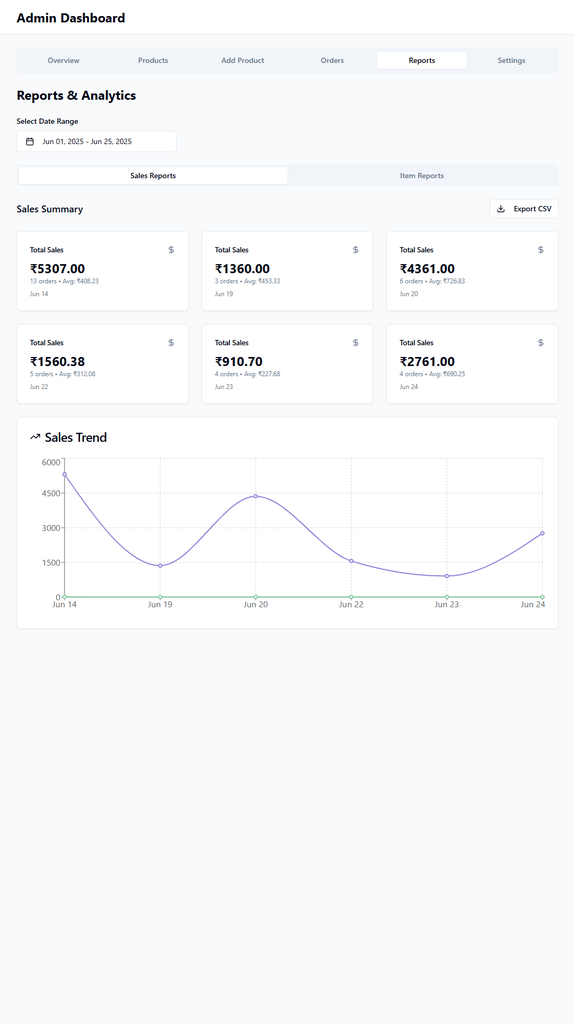
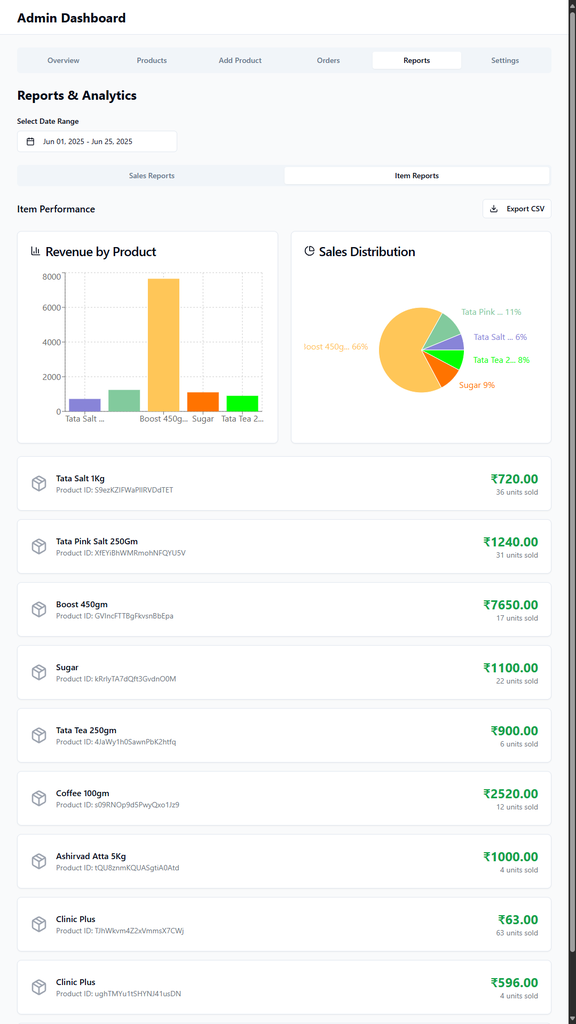
Page 5: Reports Generate reports based on:
- Date
- Timeframe
Report Types:
- Sales Summary
- Item Performance
- Export report as CSV
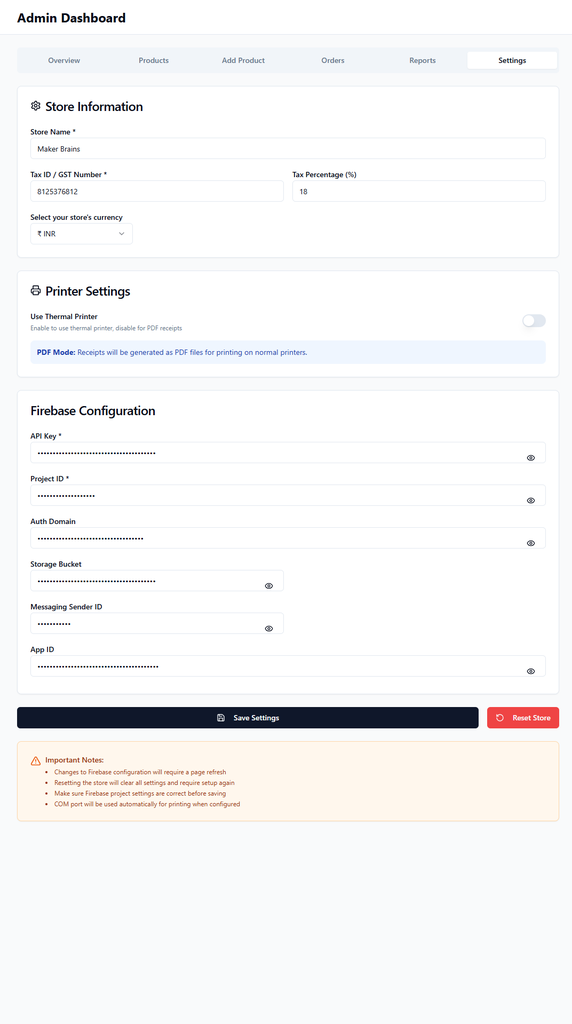
Page 6: Settings
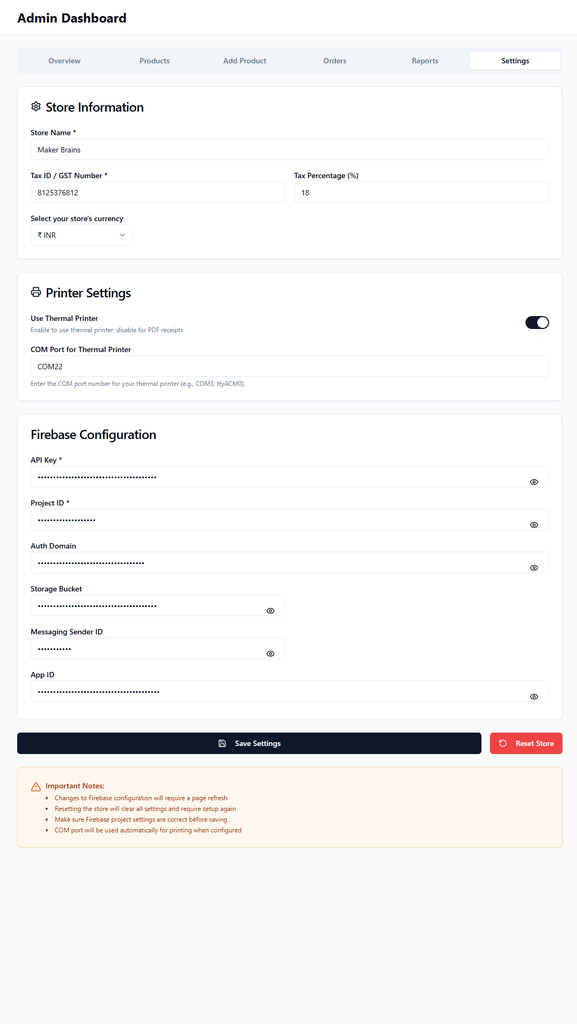
Modify:
- Store Name
- Currency
- Tax %
- Tax ID
Firebase Config:
- API Key, Project ID, Domain, etc.
Printer Configuration: Toggle between:
- Thermal Printer (via COM Port)
- Native Print (PDF output)
- Set COM Port for the thermal printer.
If Printer Setting is OFF, the app will generate bills in PDF (native print).
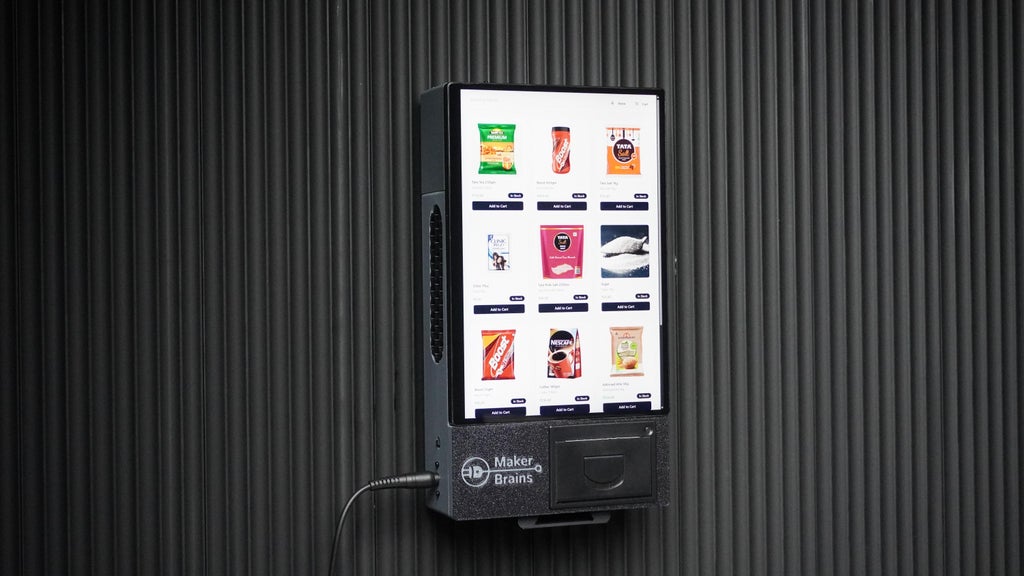
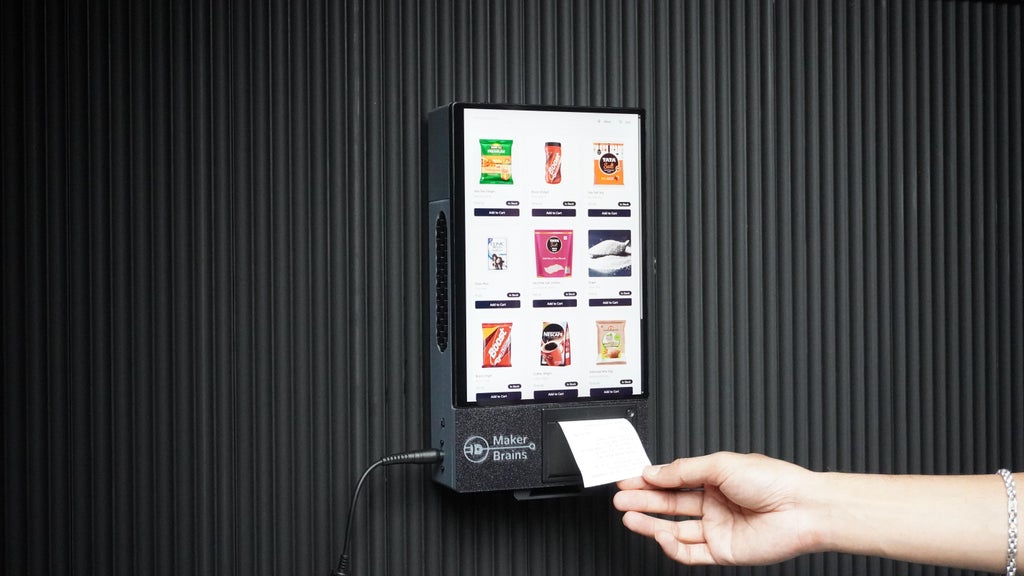
Shop Panel
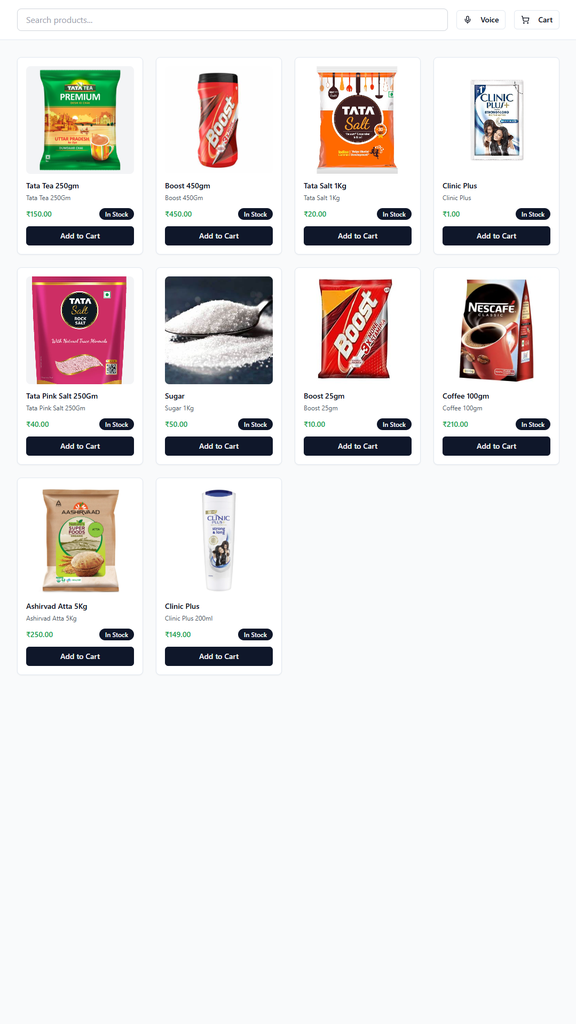
Used by store staff or customers for placing orders. Displays all items (In Stock / Out of Stock)
Search products by:
- Title
- Tags
- Search Input and Voice Search
Features:
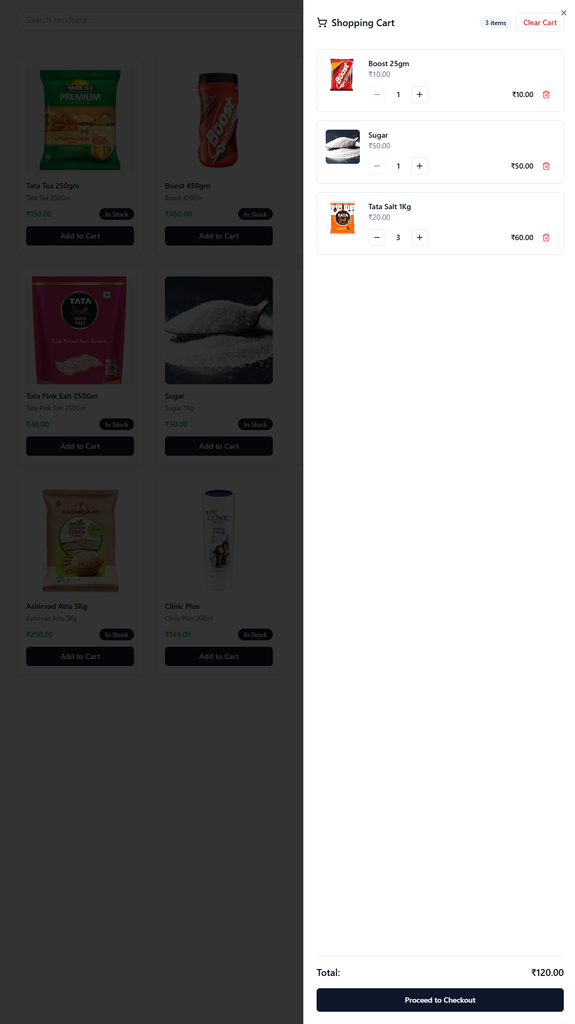
- Add items to cart
- Clear cart
- Checkout & Pay
- Print Bill
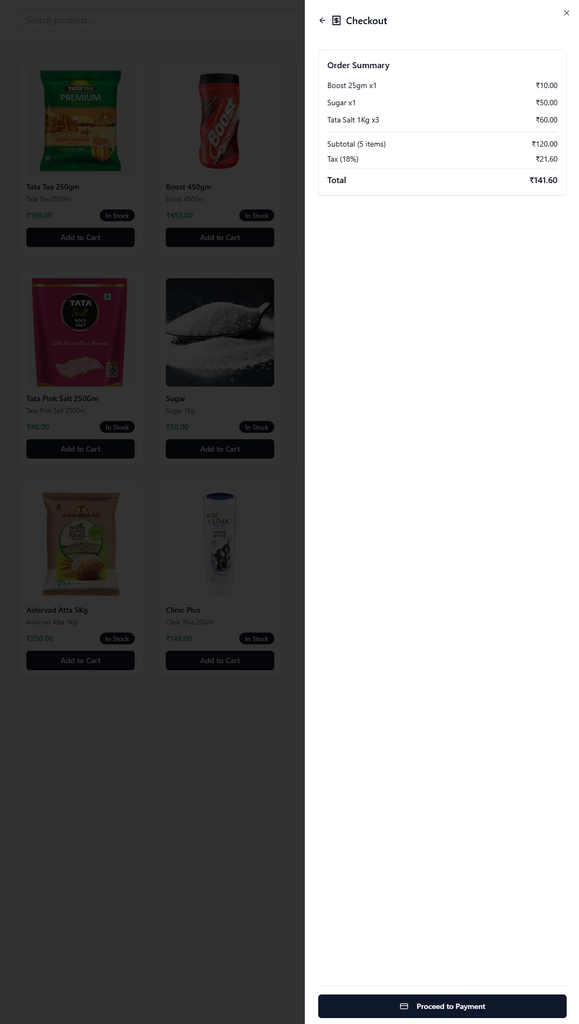
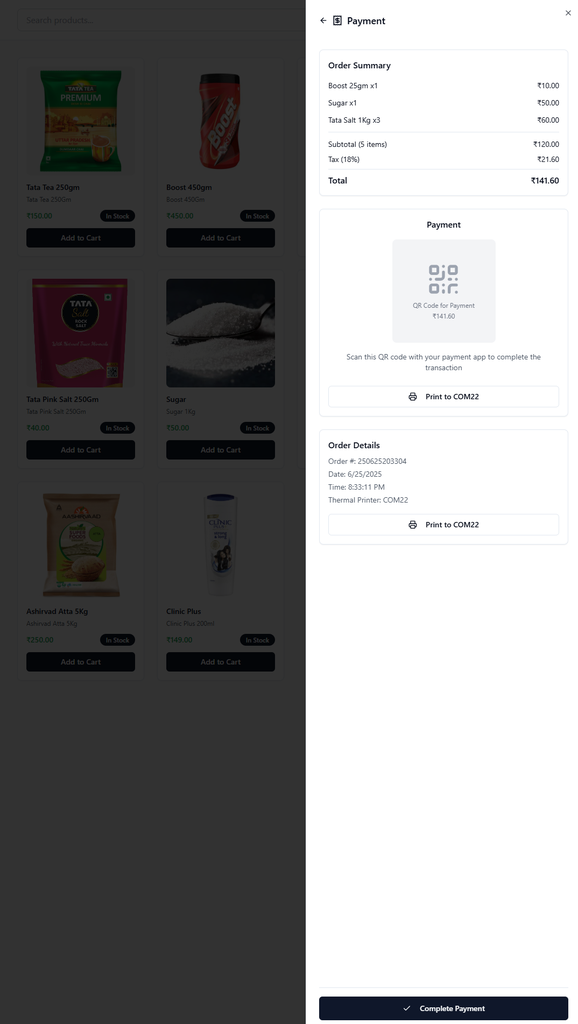
Each order is recorded in the backend with a unique Bill/Order Number for future tracking.
STEP 20: How It Works (Technical Overview)
Open Kiosk is a locally running, hardware-integrated Point of Sale system with Firebase-backed data persistence and a UART-connected thermal printing subsystem.
Application Architecture Local Execution: The application is a local-first web app built using React, Vite, and Tailwind. It runs directly on the LattePanda MU or any compatible PC, no web hosting required.
State Management: App state and settings (like Firebase credentials, store details, and printer config) are stored locally in a secure config file.
Database (Firebase Integration) The system integrates with Google Firebase for real-time, cloud-based storage and synchronization: ✅ Store Initialization - Firebase credentials & store config saved locally 🛒 Add Product - New product is pushed to Firebase DB ✏️ Edit Product - Product updates are synced to Firebase 🧾 Complete Order - Order details are saved to Firebase 📜 View Orders - Orders and reports retrieved from Firebase 📊 Reports - Data fetched via time-based queries to Firebase
Printing System (ESP32 + Thermal Printer)
- When the user completes checkout, the selected items and totals are compiled into a JSON string.
- This JSON is sent via UART serial communication to the Seeed Xiao ESP32 S3.
On the ESP32:
- The JSON is deserialized
- The data is formatted into a receipt layout
- Thermal printer commands are issued to print the bill
Conclusion
 Open Kiosk is a powerful, affordable, and open-source Point of Sale solution designed to bring modern retail features to small businesses, market vendors, and pop-up stores. With offline-first functionality, real-time Firebase integration, and optional hardware add-ons like thermal printers and touch screens, it provides the flexibility to run on virtually any PC or embedded system.
To optimize storage, product images are stored as URLs, reducing the size of the Firebase database while still allowing full visual product management.
Because the entire application is open source, anyone can download, modify, and run it on their own system, with or without specialized hardware. Even if a thermal printer isn’t available, the app supports native printing, ensuring full functionality in all environments.
Open Kiosk empowers local businesses with technology typically reserved for large-scale operations, no subscriptions, no lock-ins, just full control.
Discussion
No comments yet
Be the first to share your feedback or ask a question about this project.